MARC LABOSSIERE / FREE PRESS
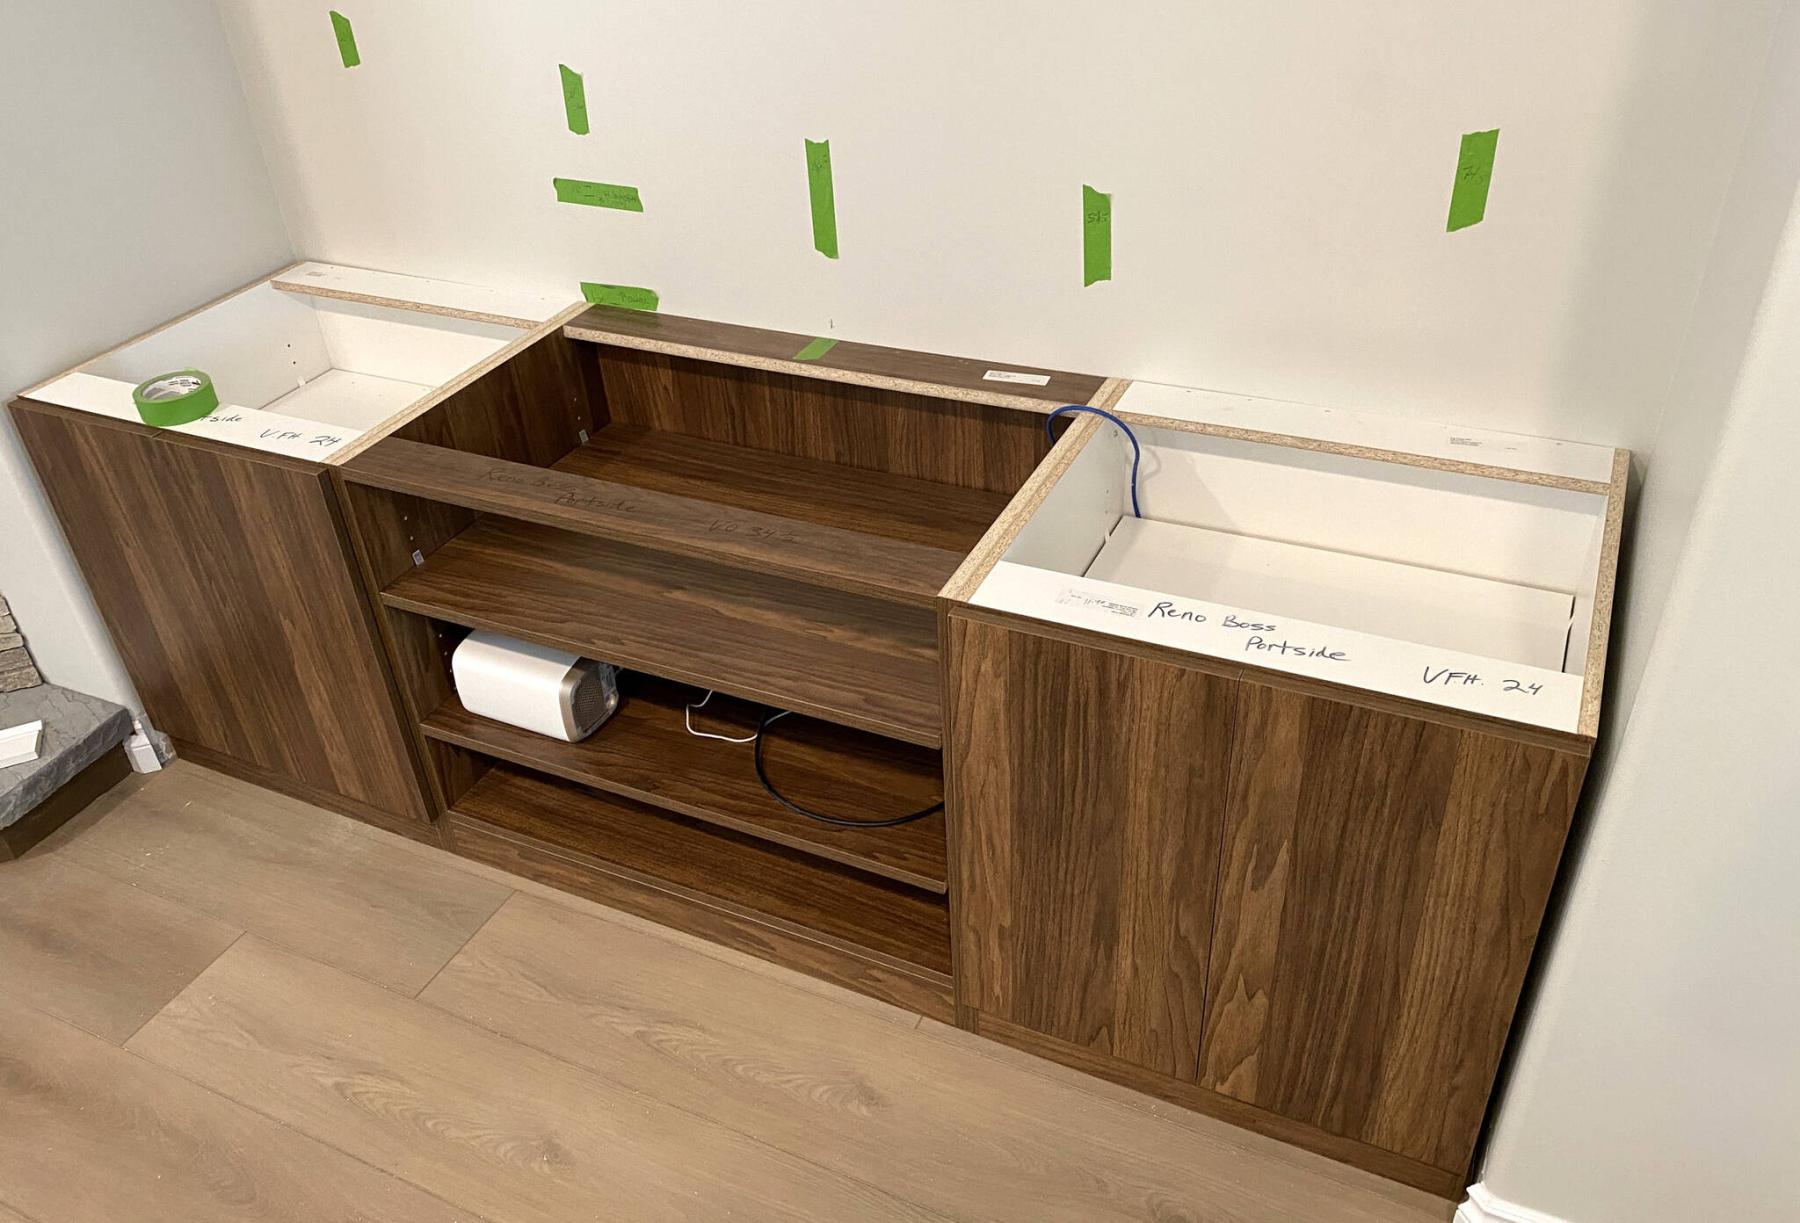
The bank of four lower cabinets were secured to the back wall once the backs of the cabinets were prepped for access to networking and an electrical outlet.
MARC LABOSSIERE / FREE PRESS
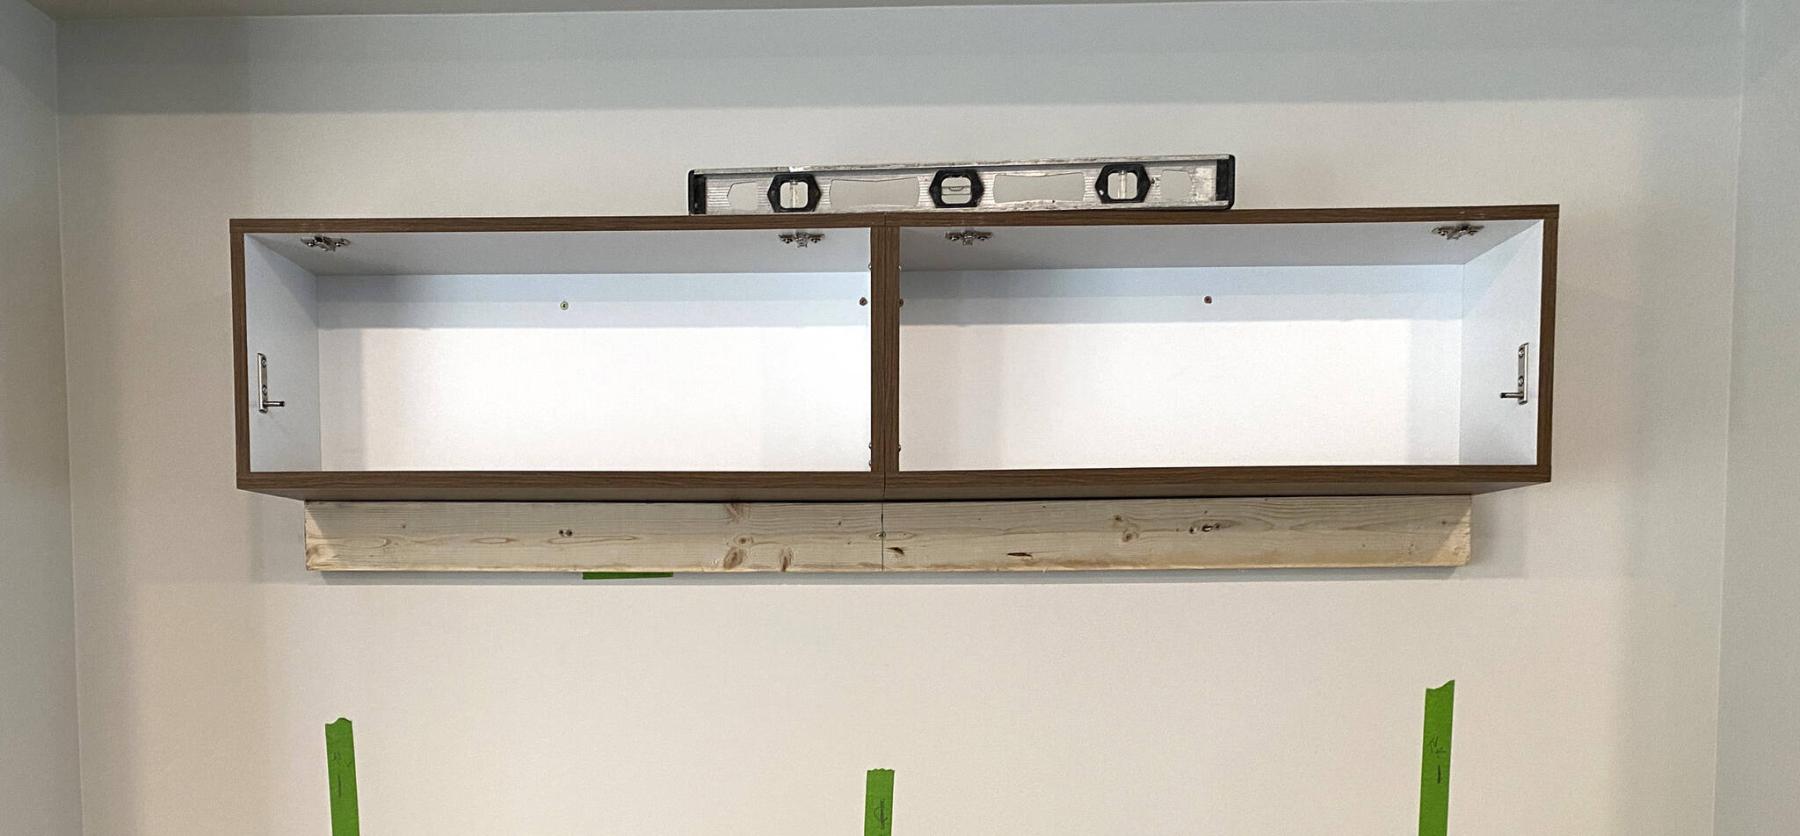
The installation of upper cabinets (and eventual side shelves) was aided by a temporary support to ensure things were centred and level before being permanently secured.
Many houses have inset nooks, or strategically placed build-outs.
For example, a dining area build-out is a great place to position a hutch for formal dishes, family heirlooms and other cherished objects.
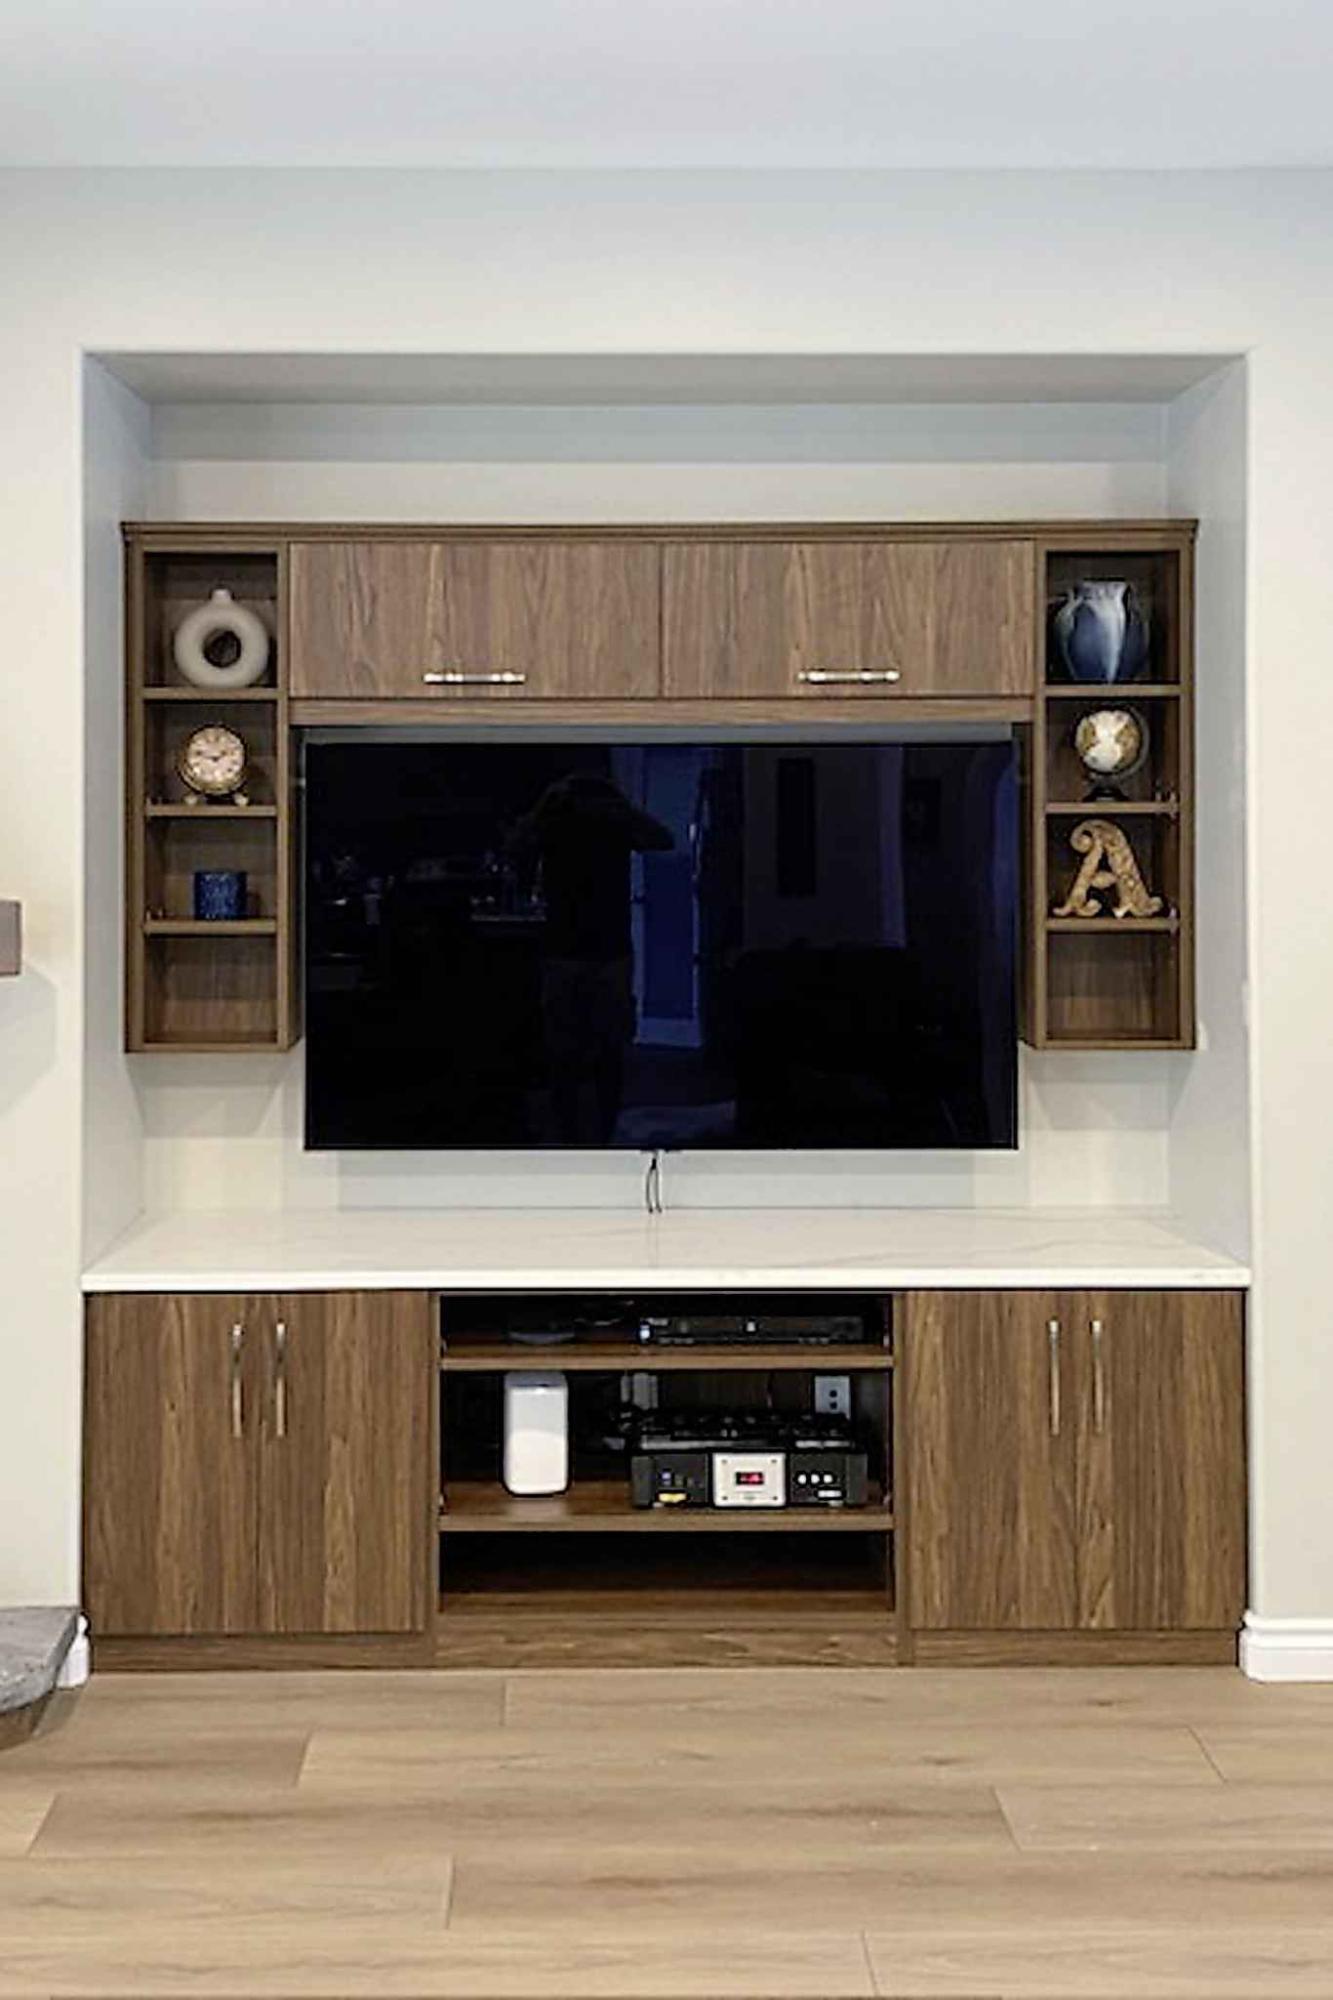
At a recent jobsite, both the dining area and living room had build-outs. And although the living space nook was being put to good use, housing a TV console table and shelves, the homeowner wanted a slightly more permanent and elegant setup.
After choosing a new layout for the built-in TV and entertainment area, colour and style choices were made for the required cabinetry. The inner dimensions of the build-out cavity dictated the size of the wall-to-wall cabinet design. The layout features a bank of lower cabinets with a quartz countertop, and two upper cabinets with shelf columns on either side that stop roughly 18 inches above the counter.
Although we discussed potentially embedding any required electrical, audio-visual and networking cables within the wall, the hassle of breaching an exterior wall without disturbing the vapour barrier ultimately led the homeowner to choose the easier route: to simply dangle any cables from the TV down through a hole to the cabinet below. Besides, once a soundbar was installed, the gaps between the countertop, soundbar and lower edge of the flatscreen would be so negligible that hiding cables in the wall seemed like overkill.
Once the cabinets arrived on site, the lowers were set into place temporarily to ensure a proper fit. The backsides of two lower cabinets were then pre-measured and customized to allow access to three existing services on the back wall of the nook: two network plates and an electrical outlet. As such, the required rectangular cut-outs were created in both cabinets. Then the full bank of lowers was shifted into position and secured to the back wall at respective stud locations. The networking plates and electrical outlet plate were then remounted to their appropriate box locations, and the plates now show decoratively along the back of the cabinets instead of along the back wall.
With the lowers in permanent position, the uppers were tackled using a temporary underside support — a level 2 x 4 mounted to the wall at the elevation of the lower edge of the uppers. Each upper was hoisted into place and secured to the back wall at the appropriate stud location.
The shelf columns on either side were mounted in much the same way. Temporary supports were used to lift the shelves high enough that a slight nudge could line up the tops with the upper cabinets as each shelf was secured to the back wall. Once all cabinet elements were permanently secured, custom trim elements were created to fill any gaps between the outer edges of the cabinetry and the existing walls. An underside valance was added below the uppers, whereas a staggered valance adorns the top edge of the uppers and shelves, wall-to-wall.
With the main cabinets in place, careful measurements were then taken to ensure the flatscreen wall-mount bracket was positioned at a height that provided a convenient gap between where the top edge of the flatscreen would sit and the bottom edge of the valance below the upper cabinets. The bracket was mounted to the wall at appropriate stud locations, and the TV-side of the bracket allows quick pop-on and pop-off access, with tilt adjustment. The bracket is also a long-arm version, allowing the homeowner to pull the TV nearly 36 inches from the wall for easy access to cables, etc.
Before the quartz countertop could be manufactured, a template was created for the most accurate fit. This could only be done once the lower cabinets were fully installed. Fortunately, everything was planned well in advance and the quartz was ready for installation the following week.
Unlike an open-space installation, the process gets tricky when you’re inserting a quartz countertop into a recessed area along three walls. And in this instance, the installation required even more finesse, because the width of the space along the back wall was slightly wider than the front face of the opening, which meant the quartz could not slide in conveniently. Instead it needed to be dropped in by manoeuvring the quartz into place at an angle — lifting one side, pushing it to the back wall and then dropping it into place. The template had been created to allow for this so that the process could occur with nominal effect on the neighbouring walls. It worked well for the most part, except for a few little nicks in the drywall that were summarily patched and painted — that’s what leftover mud and paint are for, aren’t they?
With the quartz in place, a topside hole was augered through the countertop at the centre along the back wall in order to run cables to the flatscreen and soundbar. The countertop edges along the three walls were then siliconed, completing the TV and entertainment area, which — in case you hadn’t noticed — is adjacent to the newly finished custom stone fireplace with mantel and hearth featured in last week’s column.
There’s a fine feeling of satisfaction when a homeowner’s vision can be realized in such a grand manner.