So, you want to remodel your kitchen?
Well, be prepared to gasp: a full kitchen remodel can set you back $20,000 — and that’s before the cost of new appliances. And if busting down walls for an open-concept design interests you, that amount can easily double.
Not ready to spend a small fortune? A few simple changes can achieve the desired effect on a modest budget. One particular enhancement can make a huge impact on the overall look and feel of your existing kitchen — the tiled backsplash.
When we think of kitchen upgrades, the cupboards and countertops are at the forefront of the design process. However, these can be the costliest elements to replace. If your cupboards and countertops remain in good condition, small changes can breathe life into an aging kitchen. Replacing your lighting fixtures, exchanging your cabinets’ hardware and installing a tiled backsplash are all rather simple tasks that provide the best bang for your buck — and they always improve the overall appearance of any kitchen.
Let’s focus on the backsplash. It’s generally a small area to tile, usually 18 inches from countertop to the lower edge of the upper cupboards. For a galley kitchen, the length can be as little as nine or 10 feet — that’s roughly 15 square feet of backsplash to tile, plus a little extra above the stovetop.
It all depends on the layout of your kitchen, but the point is that even if the tile you choose is $20 per square foot, the backsplash requires so little tile that the benefits far outweigh the installation costs involved.
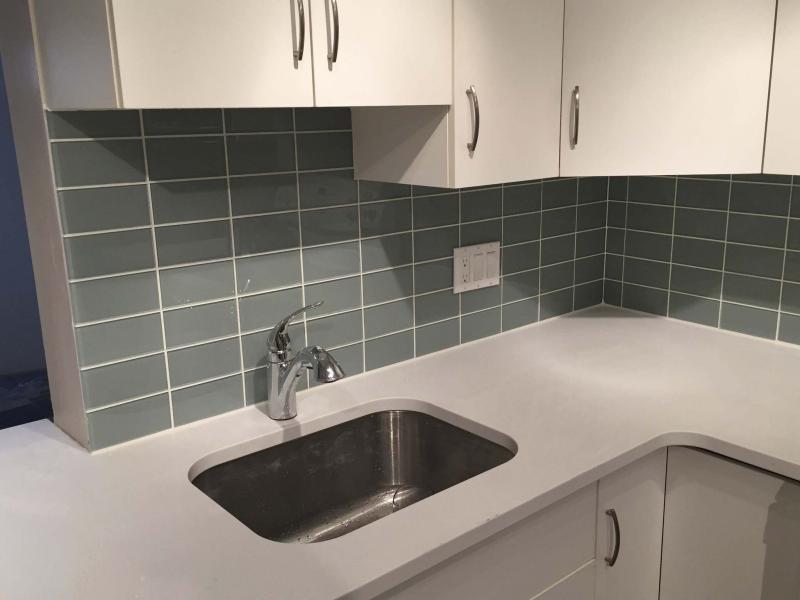
Mosaic tile happens to be the most common contemporary pick, although glass tile is also quite popular. One of my clients, Jamey Paul, chose a green-glass rectangular tile for his backsplash. Combined with his new countertops, stainless-steel appliances and flex ceiling light fixtures, the green tile truly looks fantastic.
Of course, tile selection is very subjective — it’s totally up to you. It’s often best to choose a few styles that catch your eye when browsing the tile aisle and bring samples home. Hold each tile sample up against the wall to be tiled, below the cupboards and adjacent to the countertop. A good tile choice should tie everything together and one of your tile samples will likely stand out above the rest.
It’s also not a bad idea to compare a few grout colours while you’re at it. Non-sanded grout is recommended, so the tile surface (whether mosaic or glass) does not get scratched during the grouting process.
Christine Lamontagne’s cupboards were almost new, but the bold colour of her existing walls clashed with her cabinetry. The mosaic tile and grout colour combination that she chose closely matches her cupboards — almost perfectly, in fact. And once the backsplash was ready to be revealed, Christine commented with a grin that it "brightens the space, makes it look clean and sleek."
Another client of mine, Martine Eloy, also affirmed that her backsplash "ties in our stainless-steel appliances, and makes our cupboards stand out." Martine’s mosaic selection is a series of small, elongated ceramic tiles, blended with stainless-steel-topped tiles — the perfect choice to complement her appliances.
The kitchen backsplash installation process isn’t difficult, but there are a few potential snags to avoid:
First, before applying thinset and actually placing tiles, it is imperative to do a dry run. Position the tiles on the countertop in the manner you wish to place them on the wall. The larger the tile, the more important it is to ensure that your start point does not result in tiny partial tiles when meeting a corner, or at the end of the wall. Sometimes it’s best to centre tiles — this often occurs above the stove. As for mosaic tiles, these are often 12x12-inch sheets of small tiles pre-attached to a mesh backing, in pre-set patterns. Due to the randomness of the mosaic pattern, and because the individual tiles are so small, partial tiles rarely cause any issues and a dry run is less important in this instance.
Second, a countertop likely has a few outlets. It’s necessary to turn off all breakers for these outlets before starting — electricity and wet thinset do not mix and can be quite dangerous! And depending where the outlets are placed along the wall, it is often necessary with larger tiles to adjust the intended tile placement during the dry run — it’s most convenient to notch the sides of tiles to accommodate an outlet, rather than cutting out a hole directly in the middle of a tile. Again, with mosaic tiles, this is rarely an issue. Tiles adjacent to an outlet must be cut in a manner that allows enough of an edge behind the top and bottom mounting straps of each outlet, so the outlet can be secured tightly against the wall — longer outlet retaining screws will be required, to make up for the added depth provided by the tile thickness and layer of thinset.
Third, backsplash tiles rarely slide or shift during installation, because the bottom row rests against the countertop. However, there are often gaps in a countertop to accommodate appliances, such as the stove. For each of these areas, cut a one-by-two as long as the gap is wide, and temporarily fasten it to the wall with a couple of screws, flush with the top of the countertop on either end — this will provide a solid surface upon which the tiles can rest, to prevent any shifting until the tiles set.
The grouting process completes the final step. Once the area is cleaned up and wiped down, the tiles are then polished up, and the outlet covers are re-attached… Another project completed.
The tiled backsplash — a simple way to transform a kitchen, at a fraction of the cost of a full remodel.


Jamey Paul’s green-glass tile choice, accompanied by new countertops and stainless-steel appliances.


Christine Lamontagne’s mosaic tile choice, featuring both tiles and grout that closely match cupboards.

Photos by Marc LaBossiere / Winnipeg Free Press
Martine Eloy’s mosaic tile choice, featuring ceramic and stainless-steel topped tiles.