
Photos by Marc LaBossiere / Winnipeg Free Press
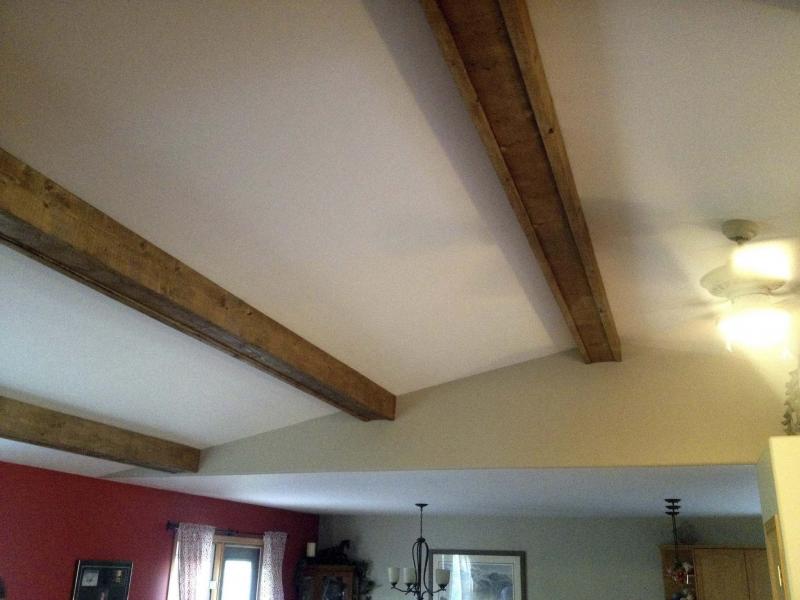
Faux exposed beams, such as these custom beams I installed in a client's house, are a popular choice these days.
Photos by Marc LaBossiere / Winnipeg Free Press
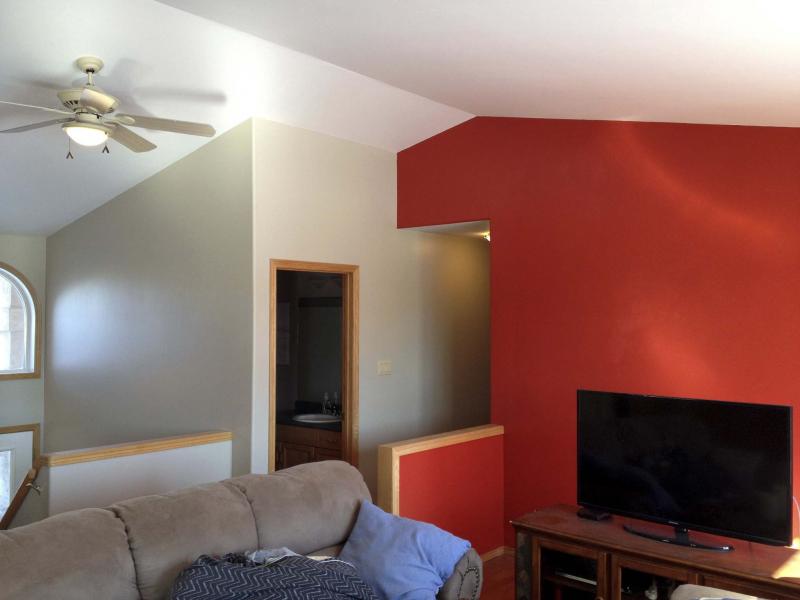
Red feature walls were a prominent aspect of my clients' home, even prior to the installation of the beams.
It’s tremendously fulfilling to embark upon a new adventure, especially one that involves a cool and challenging project. Hours can be spent contemplating the best approach, the building process and trying to determine the best solution to a problem encountered along the way. Luckily, every now and then a client unwittingly sends me on just such a voyage.
Interior painting, to me, is the icing on a cake I bake — the final step which brings to life the framing, drywall, taping/mudding and sanding stages of a start-to-finish project. Clients of mine in Stonewall, Cindy and Marc Thorarinson, asked if I would be interested in painting a good portion of their main floor.
After spending a considerable amount of time in their house already, upgrading kitchen lighting and adding a door at the base of the stairs to keep the pets at bay while they’re away, I was more than willing to oblige. Although my involvement would be solely cosmetic this time around, I was excited about their colour choices — bright red feature walls, adjacent to light grey main walls and a white ceiling.
A ton of taping prep and cutting clean edges kept me focused for quite a few days.
At some point during this latest endeavour, Cindy asked if exposed beams were popular in houses these days, and whether faux beams mounted on their living room ceiling would work. Having encountered them quite often, it was easy to envision beams in their home becoming the focal point. And in their case, beams would also enhance the loft ceiling which started at the entryway and continued through to the far side of the living room. With an optimistic grin, Cindy confessed that she had already begun hunting down faux beams, and sent me links to the manufacturers’ websites. An overview of the installation process was essential before providing my best assessment.
Well, the faux beams all looked like faux beams, but they may as well have been dipped in gold. The cost per beam was outrageous — and that was before installation labour costs. We discussed it further. "There may be another way, a cost-effective way" I suggested, "I could engineer custom beams myself." Intrigued by the prospect of lowering costs, Cindy and Marc entrusted me with the challenge.
To properly partition the space, we determined five beams worked best. Each of the three long beams would measure roughly 15 feet, the two shorter beams nearest the front entry-way would be nine or so feet in length. To restrict the weight of each beam instance, my design required the beams to be hollow.
How to do that? Well, I purchased 10 2x10 spruce boards, and five 2x8 spruce boards, at 16 feet lengths. Each finished beam would consist of a vertical board on either side and a bottom board that, when mounted, would appear slightly recessed.
We cut the boards to length — roughly three eighths of an inch shorter than the ceiling width, because we didn’t want to scratch any of the freshly painted walls. The upper long side of every vertical board was cut based on the loft ceiling angle, to ensure that the board would not only install flush against the ceiling once mounted, but would also remain level along the bottom plane.
Confirming the accuracy of my measurements was essential before cutting — wasting material would waste time. "Measure twice, cut once" was a good rule to follow on this project. And once Cindy and Marc chose their stain preference, four coats of stain and a coat of sealer gave the boards that rustic, yet finished, look.
Between the coats of staining, attention was turned to the mounts. There would be six custom mounts per long beam and four for each of the two shorter beams. The mounts were cut as wide as the width of the lower board to be mounted. Each mount top was cut to the exact angle of the loft ceiling, to provide a vertical surface on either side and a perfectly level surface along the bottom. Once the truss locations were established, the appropriate mounts for each beam were fastened in a perfect row using two, six-inch TimberLok lag screws per mount. With the mounts in place, the beam assembly could begin.
The first step would be the bottom-facing board. With Marc’s help, we lifted the bottom board of the first beam and held it in place. One end of the board was secured with three, four-inch construction screws. The opposing end was secured at every mount location. We then installed each of the side boards, in much the same manner. This process was repeated for each of the four remaining beams.
Once the work was done, we all stood back and marvelled at the ceiling. Cindy blurted, "Wow, first time at engineering faux beams — a complete success, looks fantastic". She has since added, "We get a lot of compliments, the beams add character to an otherwise vanilla ceiling." I totally agree — what a transformation!
With the custom mounts pre-installed, lifting and securing one board at a time was rather effortless. And the stain does the job, despite slight variations in the amount of absorption over the 15 feet in length per board. From afar, the beams appear to be structural as well as esthetic, which I suppose is the point of introducing beams where no beams are required.
Custom faux beams have now been added to my renovation resume and services offered. Beam assembly at ceiling level proved to be the best and likely only option. Cindy and Marc now have the faux beams they sought — at nearly half the cost — and they’re happy.
It was a sense of pride I felt, gazing up at those custom beams. But it truly was the journey from genesis to completion that I enjoyed most.
BossEnterprise@outlook.com