Marc LaBossiere / Winnipeg Free Press
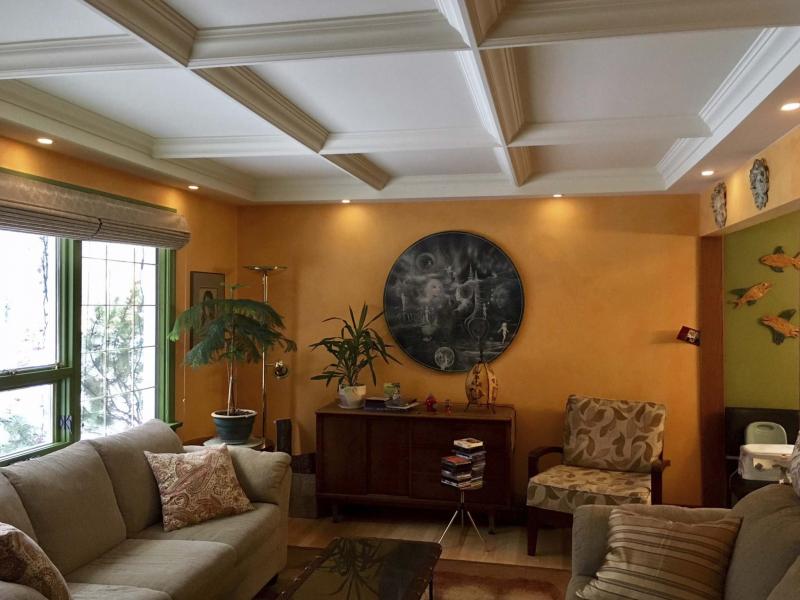
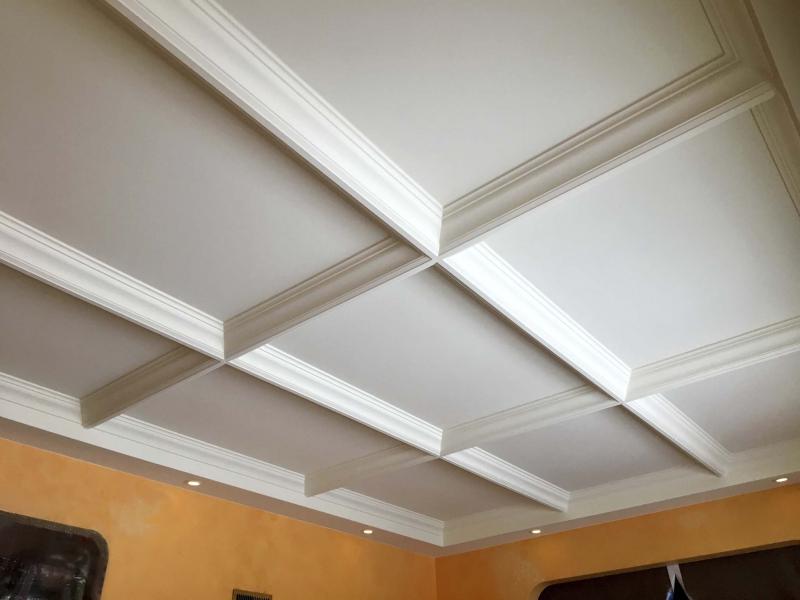
Minor gaps between the crown moulding and the ceiling are filled with a paintable caulk to give the ceiling a cohesive look. A boxed perimeter with LED pot lights adds a designer touch to the project.
The merging of building techniques often can produce spectacular and unique results. There is always a way to achieve the "goal," despite constraints that arise, monetary or otherwise.
It is very important to discuss at length with my clients an impending project, so that no details are omitted by mistake. Every once in a while, that initial dialogue yields a serendipitous project evolution, which ultimately raises expectations to previously unfathomable heights — and a decorative ceiling design is born.
Anthony Wlock and his wife, Chantal, reside in the Norwood Flats area. Their house was built in 1949, and has undergone a few modifications throughout the years. Recently, a second-floor addition — and the load changes to the main floor that ensued — triggered a few cracks in the plaster of their living room ceiling.
Anthony recalls, "We had a stippled ceiling that cracked, and Chantal found it very unpleasant to look at."
During my first site visit, the couple mentioned their disdain for stipple, and that the visible crack was no longer tolerable. I quickly assessed that the ceiling could be strapped with new drywall, but the existing plaster crown moulding likely would need to be sacrificed. Chantal also inquired whether a coved ceiling could be achieved. And so began the ceiling project evolution.
Within a few minutes, we had ascertained the ceiling would be strapped, and that additional framework would introduce a series of coved quadrants.
Wlock elaborates: "Marc came up with the idea for the boxed edges to hide the existing plaster crown-moulding. He then suggested the brilliant idea to add LED lights in that perimeter box."
Minus a few details to iron out once the project was underway, we had a sound plan for a ceiling upgrade.
Because a light switch near the living room entrance by the front door already existed, this was the perfect location to introduce a fader switch for the new LED pot lights within the impending boxed perimeter of the ceiling. Once the breaker to that circuit was disengaged, the old single-switch electrical box was removed and the breach in the plaster of the wall was widened to accommodate a double-switch box. The old switch and new fader were then reconfigured within the new electrical box. The 14/2 wire that would supply power to the LED pot lights was pulled up and into the area near the top edge of the old plaster crown moulding. After a successful test of the circuit, a temporary light was installed.
Before ceiling strapping could begin, the joists behind the existing ceiling plaster would need to be located. A series of small pilot holes were made near the exterior wall — and this confirmed the second-floor joists were on 16-inch centres.
To simplify having to work upside-down, all joists initially were mapped with string, which made it easy at a quick glance to secure the one-by-four strapping to the existing joists, using four-inch construction screws. Once the ceiling strapping was all installed perpendicular to the joists above, the next step was establishing the perimeter boxing framework, built using two-by-three lumber (to minimize the weight being added).
Based on the measurements taken on site, the lower edge of the boxing framework was affixed to the wall, just below the bottom edge of the existing plaster crown moulding. The underside of the boxing would extend roughly 11 inches from the wall, and drop nearly eight inches from the ceiling. Once the boxed perimeter was completed, wiring for the 10 LED pot lights was pulled through the framework, and drywall was attached to the exposed faces of the boxing. The pot-light locations were marked on the underside of the boxing, and three-inch holes were drilled. The 14/2 wire then was pulled down through the holes, allowing each pot light to be wired to the circuit.
The next step was framing for the sections of the ceiling for the coving process. The initial design called for 12 quadrants. In that the living room measurements are 16 feet by 12 feet, it made more sense to keep the quadrants elongated as rectangles, rather than introduce squares. Therefore, the total number of coved sections would be nine.
Two-by-four lumber was used to create these quadrants, by securing the boards upright on the wide edge to the existing strapping and joists with six-inch TimbeLok lag screws. And rather than installing the ceiling drywall to the one-by-four strapping before introducing the quadrant framing, the quadrants were framed first. This ultimately facilitated the ceiling drywall installation by eliminating the need for seams in the ceiling — each quadrant was smaller than a sheet of drywall. And by mounting the quadrant framework directly to the strapping, the ceiling drywall affixed within each quadrant minimized the exposed framing by a half inch. This proved to be very fortuitous.
The hypotenuse of 41/4-inch MDF crown moulding on a 45-degree angle produces a three-inch rise (and run). Therefore, the crown moulding along every edge of each quadrant, once installed, was flush with the bottom edge of the framing allowing for easy installation of the finishing trim to the underside of the coving.
To cut the crown moulding accurately, precise measurements were taken and marked on the framework of each leg of each quadrant. To produce a mitre for crown moulding set within a 90-degree corner, and at a 45-degree angle from the ceiling surface, the compound mitre saw blade must be set at 35.3-degree mitre, and 30-degree bevel. To avoid any mistakes, all the right sides of the 36 legs of the nine quadrants were cut first. The saw was then set for the left sides, and each leg was cut according to the required pre-determined lengths.
One by one, the mitred crown pieces were affixed to the inner perimeter of each quadrant using an air-nailer. To achieve the bottom trim, the legs were first cut to the proper lengths. The trim adjacent to the boxing face was a straight cut. However, where the underside trim meets any corner of a quadrant, a quadruple 45-degree mitre is required.
A paintable caulk was used to fill minor gaps between the crown-moulding and the ceiling, and along all mitre cuts; this gives the ceiling a very cohesive look. The tiny nailer holes were filled, and the entire ceiling structure was sanded in prep for the painting stage. A slightly off-white colour paint called "chalk" was chosen, to bring out the warmth of the bold colour of the two-toned walls.
The results were breathtaking.
"We could not predict the process," Wlock recalls, "but since I helped Marc throughout the project, I was witness to the way Marc made logical and creative decisions for the construction. It was ongoing deliberation that ultimately created a very successful design."
It isn’t often that a completed project surpasses my expectations.
In this case, the results truly are mesmerizing. By combining techniques developed to: 1) strap an existing ceiling, 2) introduce perimeter lighting, and 3) install crown moulding, the ensuing process to create coving for this decorative ceiling just fell into place.
"The ceiling is stupendous," Wlock says with a big grin. "Chantal and I were amazed at the result. The proportions, scale and design, with the lighting (which was always lacking in our living room), immensely improve the character of the room. This is the kind of ceiling you would see in a château in France."
With this ceiling upgrade, things are looking up for the Wlocks... and so will everyone who steps into their living room.
Anthony, thanks for all your daily help. We got ’er done in record time!
BossEnterprise@outlook.com