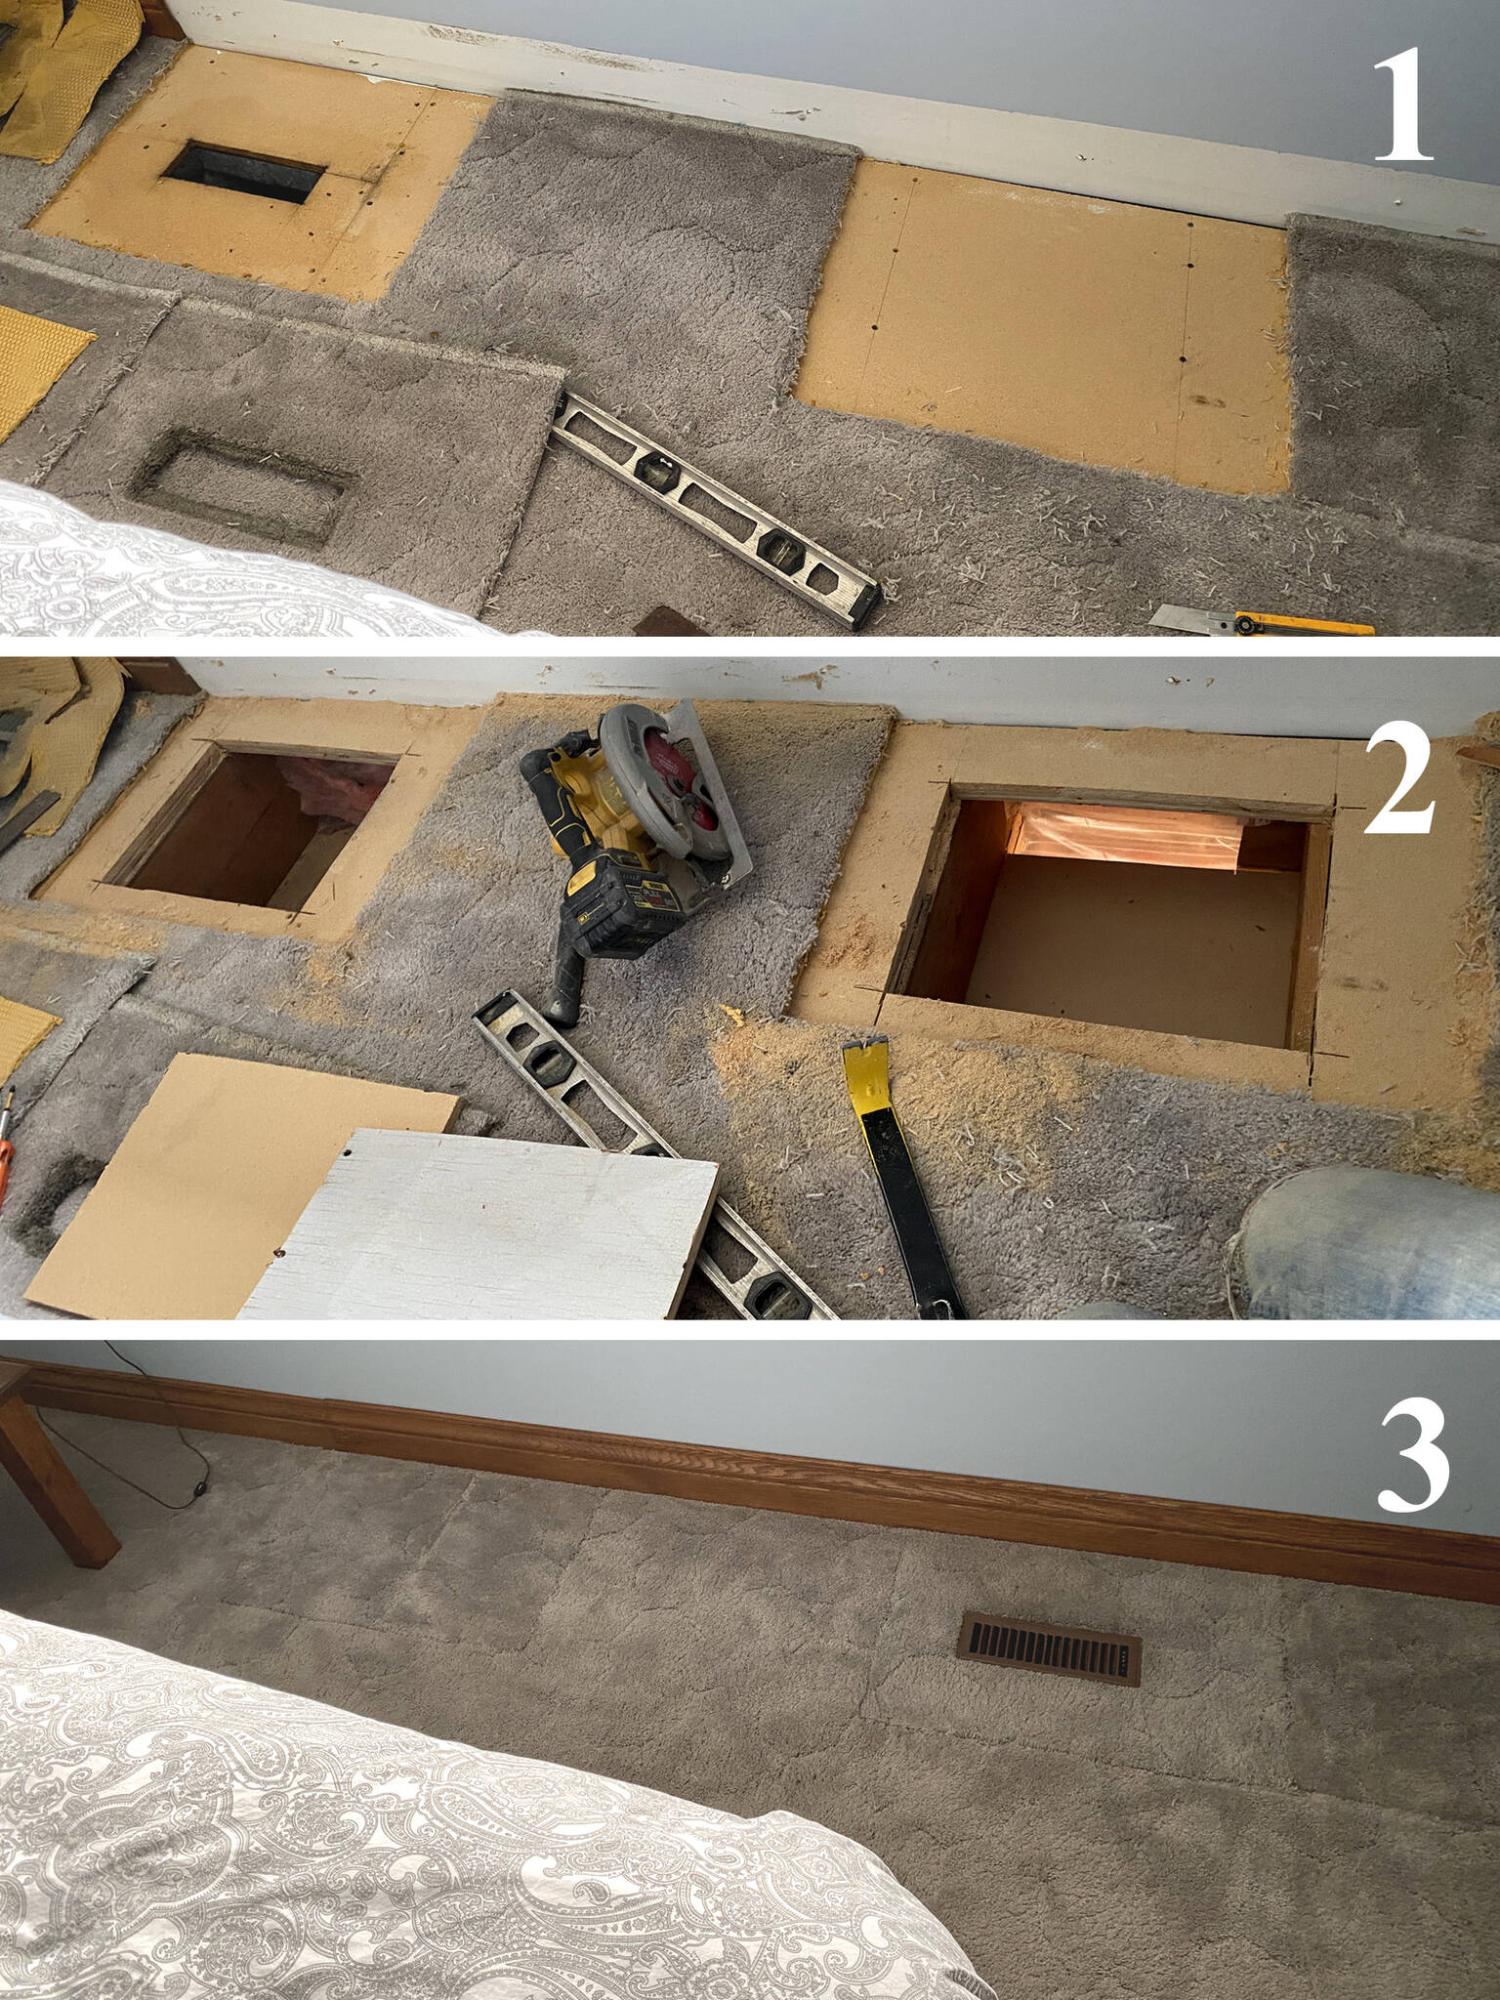
Marc LaBossiere / Free Press
Identical sections of carpet and sub-floor were cut at both the old and new locations for the floor vent relocation.
Expecting the unexpected is a simplistic saying that embodies any major renovation. During the demolition of a kitchen space in preparation for the introduction of a second window to create symmetry on either side of the new stove location along the main bank of cupboards and countertop, the homeowners experienced both a pleasant surprise once the old cabinets were removed, and an unfortunate scenario that unraveled while subsequently removing the drywall along the exterior wall.
In lieu of upgrading the existing cook-top and wall-mount oven, a slide-in stove was chosen to best suit the kitchen cabinet design layout, centered along the main wall. To everyone’s astonishment, as the existing fridge was being moved, a 50-amp stove plug (that had never been used) was already wired in the exact location for the new slide-in stove — this was an excellent surprise, and we gladly accepted the ”win”. To offset this good fortune however, during the removal of the drywall stage, revealed an unexpected heating duct that ran up through and within the stud cavity of the exterior wall into the bedroom on the second floor above, precisely at the location of the impending new window introduction. Establishing the proper approach to relocate this ventilation duct became priority, and would be addressed before any framing for the window began.
After reviewing the feeds off the main ventilation duct in the basement, the solution revealed itself quickly. There was another feed from the main duct that vents into the basement, just four feet to the right of the other feed in question. As such, swapping the termination points of these duct’s would allow the proper relocation of the ventilation feed to the second floor. And because the studs were positioned in line with the main joists along both the main and second floors, moving the floor vent on the second floor was plausible, short of knowing just how this process would affect the aesthetics of the existing flooring in the second-floor bedroom. Luckily, the bedroom was carpeted (and the carpet was slated to be replaced eventually). As such, a plan was devised to swap out sections of precisely-cut carpet, and sub-floor to accommodate the new floor-vent location.
Firstly, the three-by-ten-inch duct was disengaged within the main floor stud cavity to allow easier manipulation of the floor vent boot above, and the 90-degree junction and boot below. The five-inch ducting off the main feed in the basement was then swapped with the feed for the basement, four feet to the right. With this new run feed secured, and fed into the main floor, the second-floor bedroom preparation would prove to be the most challenging. Both the carpeting and sub-floor of the existing floor vent location and the impending new location would need to be cut using the exact dimensions, in such a way as to allow the sub-floor to rest atop the two joists for support while aligning the floor vent breach, as well as ensuring that the carpet swap would not only fully cover the cut areas, but also align with the new floor vent location. At every stage, measurements were taken multiple times to ensure accuracy, to create identical sections of sub-floor and carpet sections.
Once the carpet around the old floor vent was cut into a section, a carpet section was then cut in the new location. The sub-floor at the old vent was then cut in the same manner, and the identical sub-floor breach was made in the new floor-vent location. Once the sub-floor sections were extracted, the floor-vent boot was temporarily removed to allow greater ease of removal from the old area, and thusly inserted into the new joist cavity. The sub-floor with vent hole was then positioned into the new location, and fastened to the joists. The vent boot was then re-attached to the sub-floor. The old location was then closed off with the sub-floor taken from the new location. With sub-floor now integral in both areas, the carpet sections were then swapped to accommodate the newly introduced floor-vent locations, installed using two-sided carpet tape along all seams. Once these steps were achieved, the floor-vent relocation was nearly undetectable. The re-routing task was then completed by re-establishing the three-by-ten-inch ducting within the stud cavity by attaching it to both the boot from the basement below, and the recently relocated boot and floor-vent in the bedroom above. The success of this process paved the way for the framing and lintel introduction for the new window along that exterior wall.
The moral of the story is, it’s not always easy to assume (with certainty) what lies behind drywall until the drywall is fully removed. Having ascertained the number of ducts that run within the load-bearing wall in the center of the house, it would never have dawned on me (us) that a separate and isolated duct was fed within the stud cavity of the exterior wall. No matter, there is always a “work-around”, often complex and sometimes not. Fortunately, the work-around in this scenario was in plain sight within the joists of the basement ceiling, almost as though the house anticipated this kitchen remodel design layout that includes a new window. Well, that’s what I choose to believe, anyway. And best of all, the process incurred absolutely zero material costs, because the swap recycled every component during the shift. It wasn’t easy, but absolutely satisfying once it was successfully achieved.
RenoBoss.Inc@outlook.com