Photos by Marc LaBossiere / Winnipeg Free Press
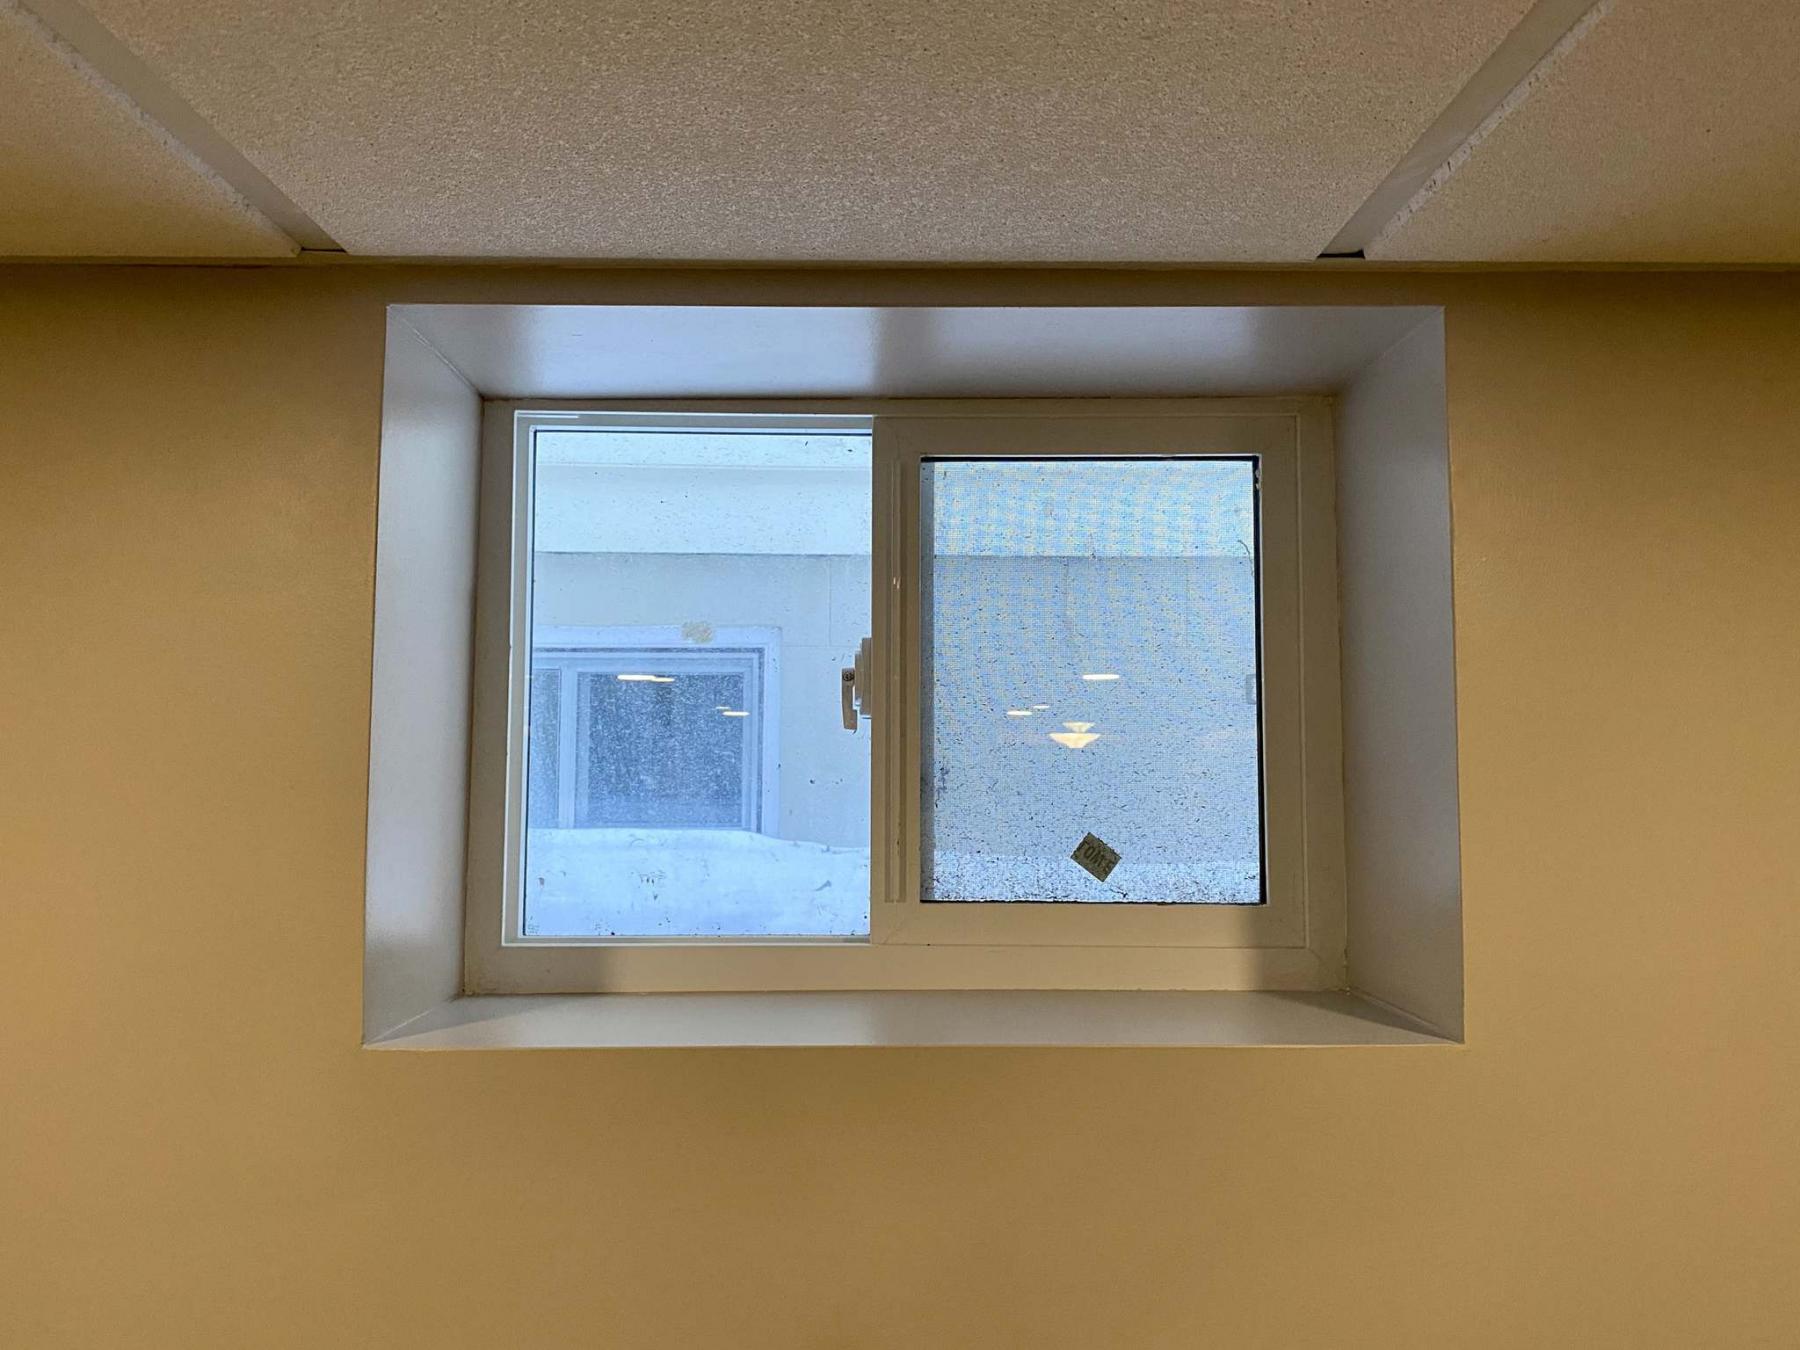
With the proper number of mud coats applied, the entire area was carefully sanded before being sealed with a high-grade primer and two coats of paint. PVC venetian blinds were also installed within the cavity at a two-inch inset.
In older homes it isn’t uncommon to discover ugly and forgotten window cavities in the basement. If the lower level was left unfinished at the time the house was built, the window jamb depth likely meets flush with the concrete wall. Once the interior walls are framed and drywalled, however, the inset from the new wall to the existing window jamb can be quite substantial.
What’s the best way to tackle the gap?
There are a few ways to go about it. In some instances, a jamb extension can be built out from the existing jamb face to meet flush with the newly installed drywall. Once that’s done, the window can then be trimmed with casing, much like most other windows in your home are finished. At a recent jobsite, and after a brief discussion with the homeowner, we decided to tackle the ugly window cavity in a different manner — with drywall, mud and cornerbead. The process takes longer than the other suggested method, but the results in my opinion exceed expectations.
Before any supplemental framing can begin, it is crucial to ascertain the desired inner length and height of the cavity’s opening. By back-measuring along the window jamb, you can determine where you wish the drywall to meet the jamb evenly on all sides. For my client’s window, the existing jamb was slightly off-center from left to right — this must be taken into account when the new framing is added, to produce a centered finished product. Furthermore, the top side of the window frame was built down low enough to provide an edge on which the suspended ceiling ‘L’-bracket could be affixed.
With the additional framework in place and secured to the existing rough opening, new poly and tuck tape was used to seal every joint along the perimeter of the window jamb, and wherever else the poly overlapped. Drywall was then cut to fit within the cavity, flush against the exiting window jamb. Drywall was also attached on the wall along the perimeter of the window opening to hide any new framing. With the drywall in place, it was time to begin the mud coats.
The first coat of mud is the most important — best to use taping mud to adhere the drywall tape along every joint, and to mount the corner bead along every outer edge. I prefer to tape my inner joints before my long joints, and install the corner bead last. Best to let the entire area set and dry for a good twelve or so hours before attempting the next coat of mud — impatience will cause you to pull mud that hasn’t yet set properly, and make a big mess. For the next coats, finishing mud was used. Along the inner and long seams, three or four coats was plenty, using a wider trowel with each successive coat. Four coats of mud are a must when implementing corner bead to ensure the taper from bead to existing wall is as slight as possible. Otherwise, the window cavity may seem to swell out along the outer edges.
Once all four coats were dry, the entire area was sanded and prepped for paint. The inner seams along the existing window jamb received a bead of paintable caulk. The surfaces were sealed with a high-grade primer, and two coats of matching paint were applied and allowed to dry and cure overnight. As a final touch, two-inch PVC venetian blinds were purchased and trimmed to fit within the newly created decorative window cavity, at a two-inch inset. And just like that, the window well was transformed from crappy to happy in a few simple steps.
Using drywall, mud and corner bead to eliminate an ugly gap between a basement window and a new finished wall may not be the fastest fix, nor the easiest. This method does, however, provide a very clean and sleek look. Furthermore, the jamb extension and window casing method would not have even worked well in this instance due to the low elevation of the suspended ceiling in proximity to the window cavity. As long as there was at least one way to get rid of the ugliness, my client was thrilled no matter the method.
BossEnterprise@outlook.com