Marc LaBossiere / Winnipeg Free Press
Once the access hatch to the attic in the recording studio was painted and set properly into position, it all but vanishes from view.
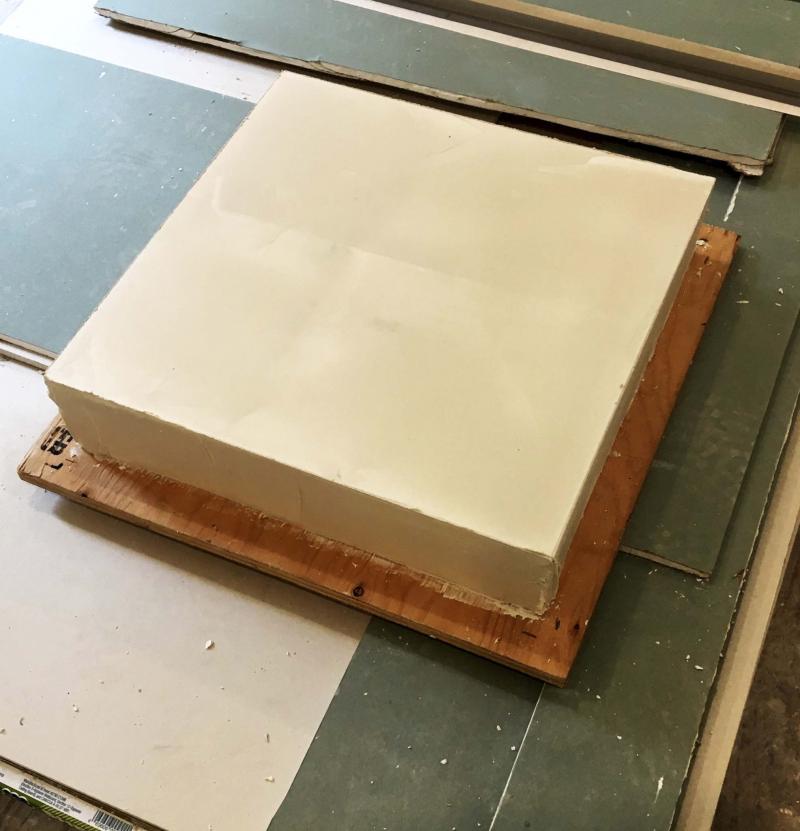
Marc LaBossiere / Winnipeg Free Press
A square hatch with slightly smaller dimensions is also finished with drywall and corner-bead to fill the access opening to the attic space.
My many years as a renovator have allowed me to develop and perfect a few techniques I’ve come to take for granted. When properly achieved, some are even discreet. My favourite is the inconspicuous hatch.
Most dwellings have an attic space, the gap within the trusses between the ceiling insulation of the top floor and the underside of the roof sheeting. And where there’s an attic, there’s access to it. When an attic is deemed a non-livable space, a square hatch can be found somewhere along the ceiling, possibly within a closet.
In its most simplistic form, the hatch is usually no more than 20 inches square, cut from three-quarter-inch plywood. Trim with an inset lip outlines the perimeter of the breach in the ceiling, upon which the plywood panel can rest. To avoid heat loss, a square piece of insulation is loosely fit above the panel when lowered, which adequately buffers the opening from the unregulated temperature within the attic. This is the norm for most homes.
When introducing the recording studio at my place, the vaulted ceilings provide a slim attic space that requires an access. No way was I about to create an eyesore along my ceilings by trimming out a simple hatch panel.
After contemplating this issue for a while, I decided to expand upon the plywood panel hatch method by creating a suspended hatch which, when in position, would rest flush with the ceiling, but would be suspended from within the trusses rather than by trim affixed to the underside of the opening’s perimeter.
This is what I did: first, I maximized the opening — for trusses on 24-inch centres, this means roughly 22.5 inches of space between each truss. To finish the inner sides of the opening, half-inch drywall would be affixed to each of the four sides of the square opening, leaving roughly 22.5 inches of from side to side. To create the hatch itself, which would also be finished with drywall on the visible side facing down from the ceiling as well on each of the four sides, a square frame using two-by-fours was fashioned at no more than 20.5 inches per side.
Because the drywall will increase this length by half an inch per side, the full length of each side becomes 21.5 inches. This will provide roughly a half-inch gap per side. This frame was affixed to the centre of a 24-inch square piece of three-quarter-inch plywood — the plywood lip will sit atop the truss framework. Insulation was used to fill the void within the two-by-four framework, and drywall was affixed to the exposed side of the frame and to each of the sides.
After a successful dry-fit test with the hatch sitting in the opening, a 90-degree corner bead was used to finish the edges of each side on both the hatch itself and on the inner sides of the opening in the ceiling. Because the corner bead adds about a quarter-inch to the length on each side, the final gap along the perimeter of the entire opening should be no more than a quarter-inch all around. Each length of corner bead was mitered on the picture-framed side of the hatch and the exposed side of the ceiling opening. After a few coats of mud and proper sanding, both the ceiling and hatch are painted. The hatch is set into place (with additional insulation placed loosely atop the plywood, the opening all but disappears from view… unless of course, you really look for it)
The inconspicuous hatch has become a process I’ve incorporated into my regular framing and drywalling routine when it comes to ceilings and attics. I suppose I’d forgotten it isn’t the norm. Based on the reactions of my clients, maybe it should be.
bossenterprise@outlook.com