A few weeks back, a client asked what my first home renovation was and when it occurred. Other than changing the paint colour in the rooms of my first house, the truth is my very first reno was so long ago I couldn’t recall.
Or was it? I recently stumbled upon an old photo of a renovation from my first house in St James, circa 1998. That photo, shot on film, may very well document my first reno.
Upon entering the bi-level house, the front landing is the mid-way point of a staircase which takes you up to the main level, or down into the basement. Upon moving in, every room received a coat of paint, and I believe the kitchen cupboards did as well.
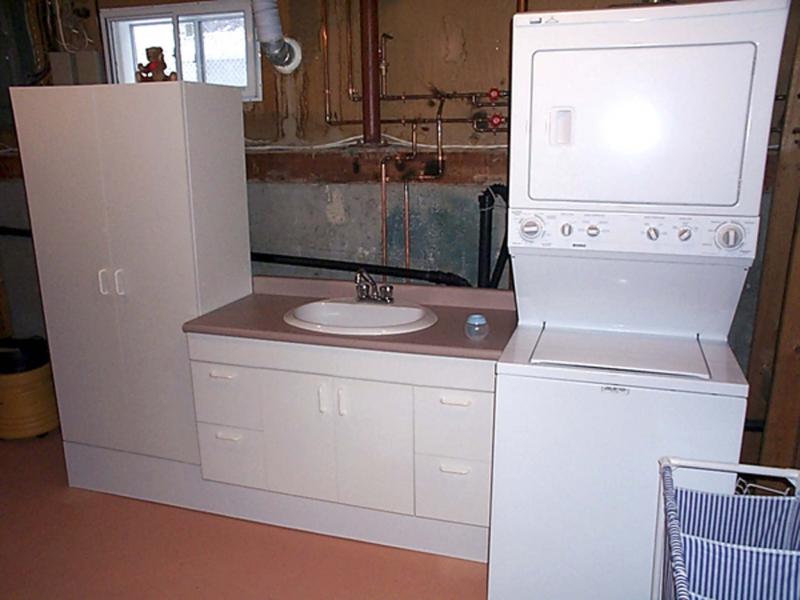
However, the room that required the most attention was the laundry room — both the washer and dryer were old and failing and the room itself was not very inviting. To promote better functionality, an upgrade was required.
As a first step, the concrete floor was pre-painted with a durable concrete paint. A stackable washing machine and dryer combo was then purchased and at the time of delivery, the old leaky washer and small-capacity dryer were hauled off for recycling. Once the water feeds, drain, as well as the electrical requirements and venting were mapped to the proper location along the right side of the room upon entry, the stackable washer and dryer were set into their permanent position. The next step involved placing a four-foot vanity with sink between the laundry appliances and a new wardrobe to serve as storage.
The problem was the floor — it had a harsh grade towards a floor drain which made it impossible to level while positioning the vanity and wardrobe. What could be done to resolve this?
The easiest solution I could think of at the time was to build a base which contoured the floor grade wherever the base support met the floor, while providing the level surface that the vanity and wardrobe required. To achieve this, a ladder framework was constructed with two-by-eights, ripped along the bottom edge at an angle to adequately follow the pitch of the concrete floor. Once level was ascertained with the framework set into its intended position, the vanity was placed atop the framework adjacent to the washer and dryer.
The wardrobe was then set next to the vanity, in line with the outer edge of the support frame. The countertop was affixed to the top of the vanity, the sink-hole was pre-cut and the sink was then fastened to the counter. The water feeds and drain were then connected to the sink and faucet, and everything was tested before the final touches were achieved.
White handles were installed on the doors and drawers of the vanity, and on the two doors of the wardrobe. To hide the lumber support framework below the vanity and wardrobe, a proper length of white arborite shelf board was cut to fit along the base from the washer and dryer to the outer edge beneath the wardrobe, contoured along the lower edge to mimic the grade of the floor.
With all the new features installed, this laundry room now provided a functional space that was much more inviting.
Thanks to a photo taken two decades ago, I suppose it confirmed how it all began, my love of problem-solving and passion for building and assembling.
It seems even back then I also appreciated the importance of photo-documenting. Not sure why I chose a salmon-coloured countertop, though — it must have been on sale.
BossEnterprise@outlook.com