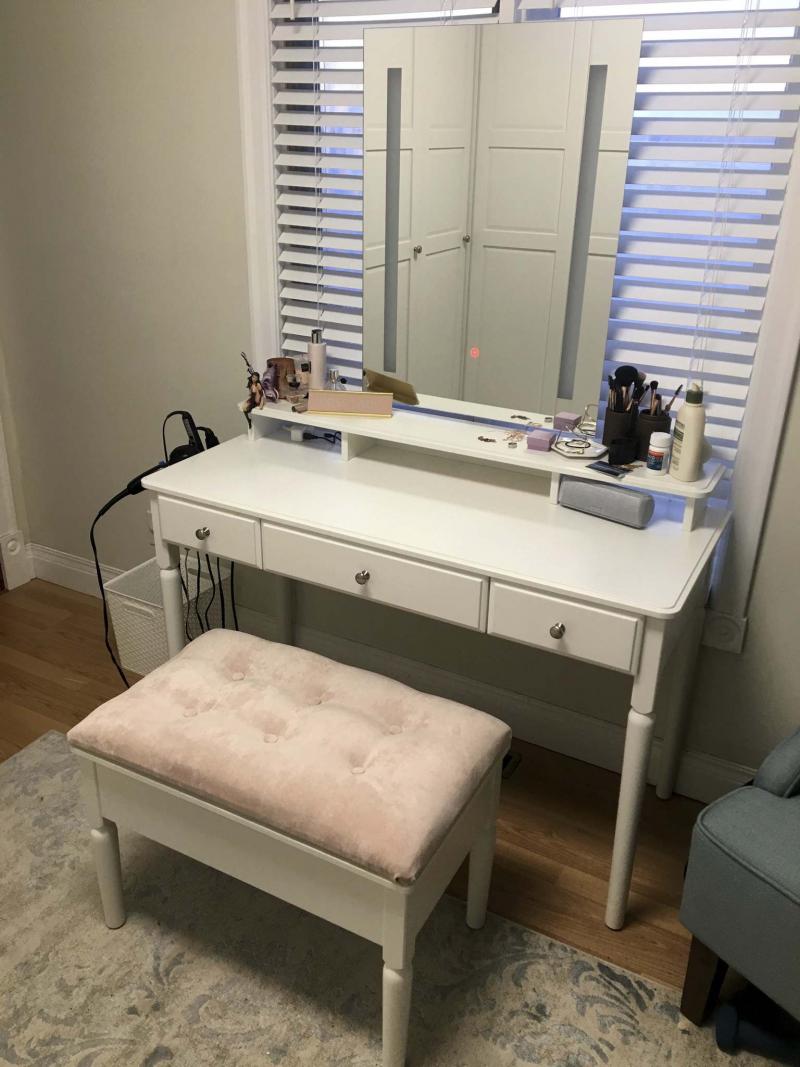
Pink fabric was used to upholster a custom seat cushion for a vanity bench.

Rust-coloured fabric was used to recover these circular bar stool seat tops — due to the sewing involved the pros at Ron’s Custom Upholstery were given the job.
Sewing upholstery, especially the interior carpet package of a 1973 MG Midget, was not the easiest DIY project to tackle.
In my experience, upholstery is usually best left to the professionals. On past occasions however, I have dabbled within this realm, with a modicum of success. After an exhaustive search for a very specific item I wanted to give my lovely Carole for Christmas proved an exercise in futility, it seemed a DIY upholstery project was inevitable.
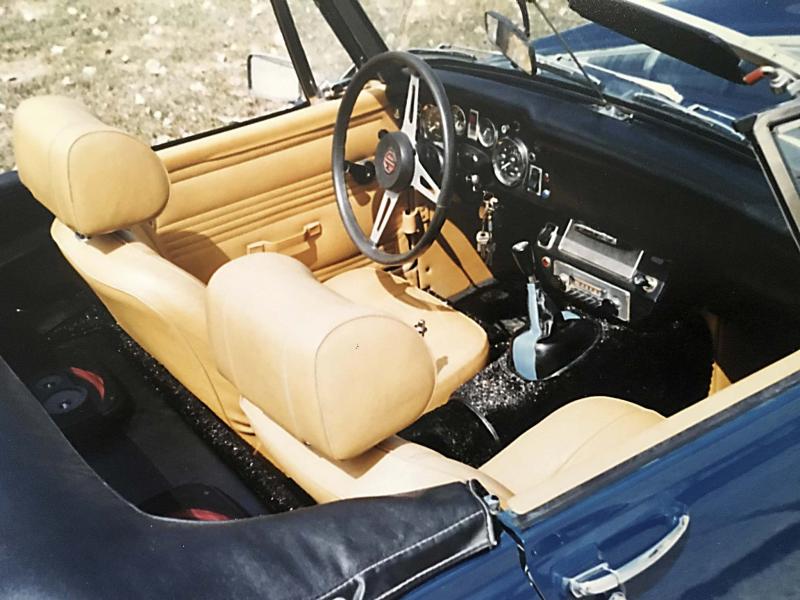
My first attempts at upholstery stemmed from requirement; a guitar case needed a new lining, the fabric of an old stool seat was torn and was recovered, and so on. My favourite DIY fabric story involves my 1973 MG Midget convertible, circa 1991.
That was a fun ride, especially with the top down under the hot Manitoba summer sun. Although the ragtop had been replaced and the car virtually completely restored prior to purchasing it, the interior carpet package had not been touched.
It was in pretty good shape, but with the top up, a subtle scent of mould was evident — clearly due to years of moisture having potentially penetrated the vehicle during a sudden rain storm, with the top still down. After carefully removing the carpet sections of the car, I decided it’d be easier to mimic these sections with new pieces rather than attempt to sanitize the old ones. To avoid the formation of mould or mildew in future, I elected to use a waterproof black Astroturf, edged with black pleather.
Each of the carpet sections were first traced onto the black Astroturf using chalk, and these patterns were then carefully cut. Inch-wide lengths of black pleather were then cut to serve as edging. After having received adequate instruction from my mom as to how to use her sewing machine (without breaking it) that I had borrowed, I painstakingly sewed the pleather to the Astroturf along each edge. To cover the length of the stick-shift, alternating black and blue panels were sewn together, set into position before the newly fashioned carpet (Astroturf) sections were set into position. It turned out not too badly, and I never worried about rushing to put the top up in the event of an impending deluge.
The experience taught me two things: upholstery isn’t my forte, and the process is much like being a seamstress: you gotta know what you’re doing or things can go wrong — quickly!
Since then, I’ve only ever recovered firm seats of stools or benches, which essentially entails placing the new material onto existing or new padding and evenly pulling the material taut while successively fastening the material to the underside of the seat with a staple gun. The coat rack bench in my foyer received new tweed-esque material on the bench top that matches the other chair in that room.
Although the round seat tops of the stools along the high tier of the peninsula island in my kitchen also received a similar upgrade, I called upon the pros for this task — Ron Schewe at Ron’s Custom Upholstery had always been my upholstery go-to.
When the fabric on the numerous cushions of my outdoor patio furniture began to fail, Ron and his crew flawlessly re-upholstered every one of 32 cushions, allowing me to avert having to outsource new cushions that would likely have never quite fit properly on my existing outdoor furniture.
My circular bar stool tops required quite a bit of sewing. And once again, Ron’s Custom Upholstery did an impeccable job.
With the walk-through closet adjacent my (our) master bedroom recently completed, Carole’s makeup vanity and lighted mirror was also fully functional.
However, on a few occasions Carole mentioned her desire to find a suitable cushion for the bench — the firm surface was hard on the butt. I tucked this little request away, knowing full well that Christmas was around the corner. Despite a lengthy search, I never did come across a cushion of preferred colour palette and proper dimensions that would do the job, and I was running out of time.
Although Schewe would have orchestrated an amazing solution to pad this bench seat, it would never have been ready in time for the holidays. So once again, I set forth on a DIY upholstery quest, which presented a big dilemma — it would be next to impossible to conceal my efforts if I were to upholster the existing seat top of the bench. How could I secretly get this done and gift-wrapped in time?
And then it dawned on me — if I cut out a base for the bench cushion that matched the dimensions of the bench-top itself using half-inch plywood, I could upholster it separately and fasten it later. So, I cut out the cushion base, and rounded the edges to match the bench top. After wandering the aisles at Fabricland with Carole’s eldest daughter one afternoon a couple weeks before Christmas, the perfect material for this project was eventually located.
I began by cutting two-inch foam padding in the shape of the seat top. Six upholstered buttons were fashioned using the same material, to add bevel to the top of the cushion, in uniform quadrants. To achieve this, two tiny holes were drilled at each location where these buttons would be placed. Once the foam was set atop the cushion base, the chosen fabric was pulled taut and evenly along each edge and stapled to the underside of the base. Once all four sides were evenly affixed, it was time to fasten the decorative buttons. A long three-inch needle was used to establish the initial topside breach through the fabric from the bottom of the base. Once the thread had been pulled through and around a few times, I pulled on it until the desired divot appeared on the padded side of the cushion top. This was repeated for all six button locations.
With the bevels in place, the decorative buttons were then sewn onto the cushion top, using the same long needle, and fastened to the underside accordingly. The rough side of Velcro strips were affixed to the underside of the cushion base at each corner using the staple gun, whereby the soft side of the adhesive Velcro could then be adhered onto the existing bench top, ensuring that once the cushion was in its desired position, it would remain perfectly in place until such time when the cushion could be removed without damaging the bench top.
The entire process took several hours, over multiple days.
I anxiously awaited our family gift opening on Christmas Day — and Carole’s expression did not disappoint. As it was the last gift Carole opened, she proclaimed with a hint of relief in her voice, "you found me a cushion!" Her daughter promptly corrected the statement by injecting "… made you the cushion" (having been provided photo updates throughout the process — Carole’s daughter, I think, was as anxious as I was for her mom to open this gift). Carole added, "It’s the perfect colour, I love it," and that’s all I needed to hear.
My impromptu upholstery undertaking was a success.
I admit, on more than a few occasions during this DIY process, doubts had crept in and caused some panic. Thankfully, the project resulted in a beautiful grin, a kiss and a great big hug — what more could I have asked for?
bossenterprise@outlook.com