Marc LaBossiere / Winnipeg Free Press
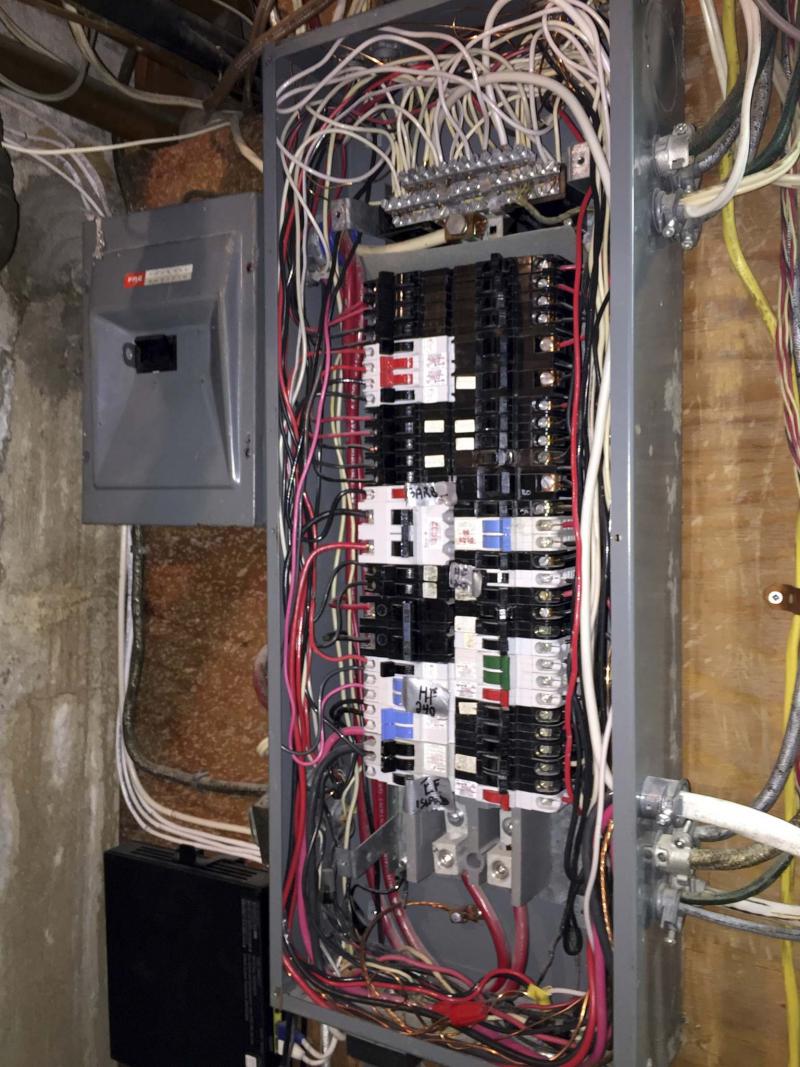
A jam-packed main electrical panel underscores the complexity of residential electrical wiring.
Marc LaBossiere / Winnipeg Free Press
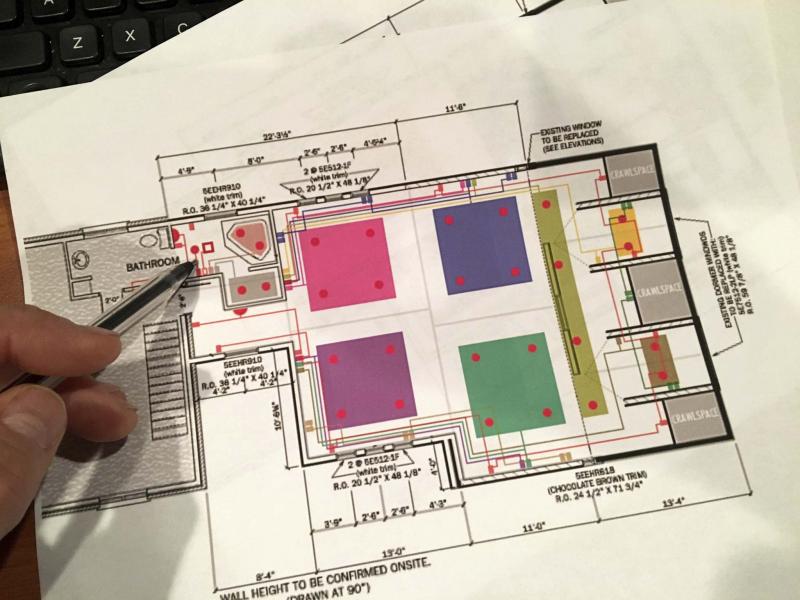
The electrical circuits design for the studio floor plan, which is required for the electrical permit application.
Marc LaBossiere / Winnipeg Free Press
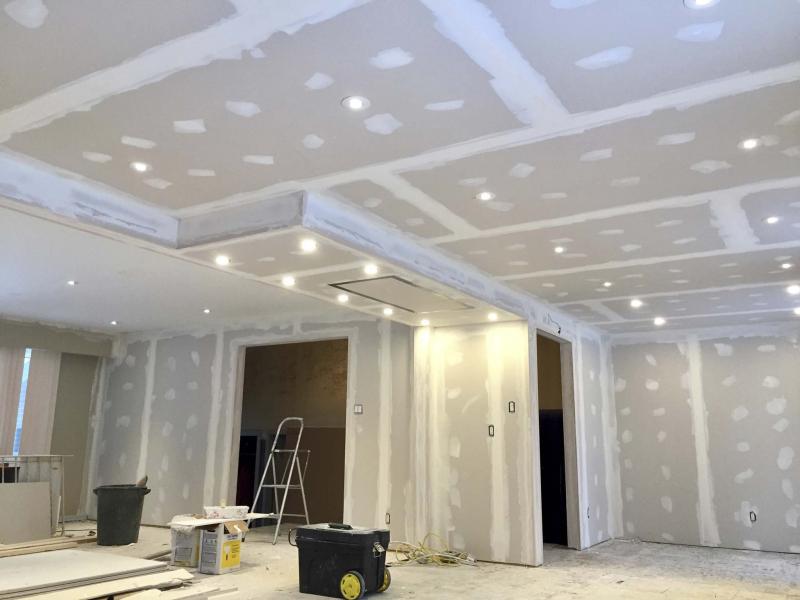
Five different groups of ceiling pot lights visible at Garth Nemy’s kitchen remodel; hallway, two for main kitchen, above the peninsula island location, and living room area.

Three of seven groups of pot lights in the recording studio, with each on three-way fader switches for maximum lighting versatility.
When it came time to complete the electrical wiring for my recording studio, anxiety had long been running through my veins. I had elected to apply for my own electrical permit at the local Manitoba Hydro office and perform the electrical installation myself.
In the spirit of preparedness, every single pot light, outlet and switch was marked and colour-coded for clear reference on my studio (and bathroom expansion) floor plan, using Photoshop. Although the task took several weeks to complete, it would be the looming final inspection that kept me up at night.
Electrical wiring is not for everyone — it can be scary. Safety should always be the number one thing on your mind when attempting changes or upgrades.
All breakers for the circuits being manipulated should be set to the off position before you begin. And if the main electrical panel is not properly marked, take the time to map out your existing electrical circuits by turning off each breaker, one by one, and note what lights and outlets are affected as you move from one circuit to the next.
When introducing a new circuit to your electrical panel, the breaker should again be in the off position until all wiring has been completed before you proceed to test any new circuits.
My recording studio has a complicated wiring design. There are seven groups of lighting circuits, each with four pot lights on three-way fader switches, as well as 54 separate outlets on four different circuits. Along with the wiring required to accomplish all of this, there were also two new circuits introduced for lighting in the adjacent bathroom expansion, as well as an exhaust fan, a heat lamp, and thermostat for the heated floor.
All this wiring was mapped through the house from the north side of my second floor to the south side of the basement, where the main electrical panel is situated. My house has a 200-amp service, which can easily accommodate the proposed additional circuits and load they would present. However, the existing 48-breaker panel was nearly full, and required an upgrade to a 64-breaker panel. By the time the panel upgrade and all wiring was completed, nearly one kilometre of new copper wire had been pulled through the house.
I will never forget the day of inspection, as it had been very stressful awaiting the potential outcome — would everything pass? The Manitoba Hydro inspector entered my premises and immediately walked up to the second floor and into the studio.
Against the stud framing, the plethora of parallel wires and 90-degree corners seemed somewhat artistic in nature… it was almost a shame these skeletal walls would eventually be enclosed by drywall, hiding the symmetry of the studio’s nervous system. The gentleman jumped up on a ladder and pulled out a bulb from one of my pot-light boxes.
He read "40 watts" off the top of the bulb, and again uttered "maximum 40 watts" as he peered into the light-box housing. A tiny bead of sweat began to form above my brow — how much longer would this take?
To my astonishment, the next words from the inspector’s mouth quickly eased my suffering. He simply said, "Things appear to be in order, I’m gonna head home — you were my last stop today," and he left. That was it — I had been worried for nothing, apparently. I found out some time later that inspectors just "know" when they see a wiring job if there should be any cause for concern.
Electrical wiring is best left to professionals. Although the concept of wiring a circuit can be very straightforward regarding outlets, and single-pole switches for one or two lights, the introduction of complex wiring can quickly unravel if you do not know what you are doing.
And tying into an electrical panel that is nearly at full capacity is not something to fool with. Many of my clients either want to expand upon an already existing circuit by increasing the lighting in their ceiling with multiple LED pot lights, or by introducing an outlet higher up on the wall to accommodate the power requirements of a new flat-screen TV or wall-mount fireplace (which when hung in place, won’t dangle the power cord from behind it with a new outlet set higher on the wall).
These tasks are easy enough for the confident DIYer, provided the fundamentals of wiring are understood. I had originally intended on describing a few of these installation scenarios in detail, but realized quickly how wordy each explanation would be if I were to do so. And furthermore, every wiring scenario has its own slight variations. I intend to focus on a few specific and isolated situations in future columns.
In the meantime, I’ll share with you a very specific wiring scenario I introduced in my home very early on. The possibility of a bathroom appliance (such as a curling iron, or hair-straightener) being left on after leaving the house always frightened me — this is tantamount to leaving a stove element "on."
And despite having been aggressive in monitoring whether said bathroom appliance had indeed been unplugged before leaving the house, there were a few occasions where it had not been. I came up with a solution to alleviate my worries. During the studio build, the main bathroom was extended, and the entire bathroom space was rewired. For the GFI outlets near the sink, an electrical timer switch was introduced. The switch allows power to the outlets to a maximum of 30 minutes only. And once the timer runs out, the outlets shut off automatically — anything plugged in no longer gets power.
Safe to say, worries of red-hot curling irons and hair-straighteners have become a thing of the past.
Electrical wiring can be simple, or complex. It can be achieved quickly, or may take a tremendous amount of time. It all depends on what’s involved.
In my experience, it is best to adequately evaluate electrical needs before modifications or additions are made to an existing electrical situation.
Whether updating outlets, introducing a fader switch, or adding a few pot lights in a ceiling for improved lighting, it is imperative that the breaker is set to the off position before you proceed. Be safe! And although Google and YouTube have made it much easier in recent years for the DIYer to tackle some of the simpler electrical tasks, when in doubt, contact a certified electrician.
BossEnterprise@outlook.com