45-degree spring angle crown mouldings installed at Roland Lavoie’s house, after having strapped new drywall to the ceiling to cover up old plaster ceilings covered in stipple paint.
Photos by Marc LaBossiere / Winnipeg Free Press
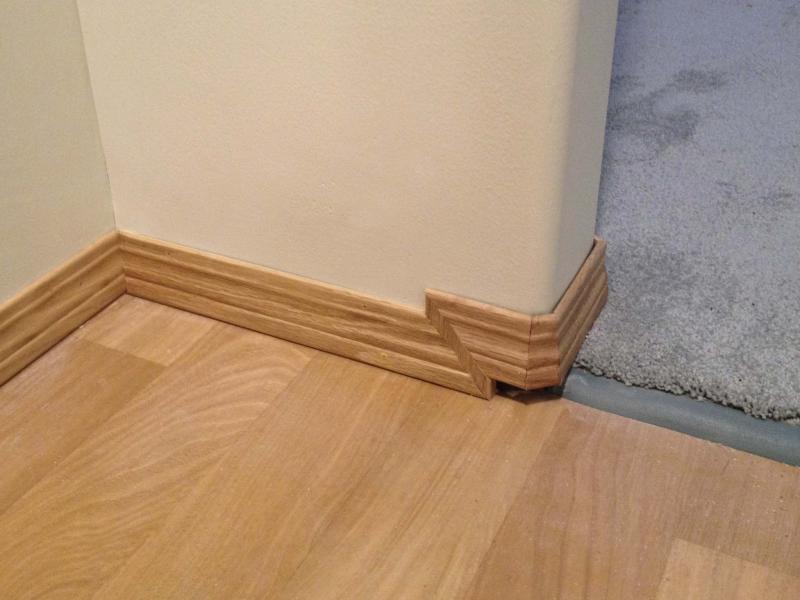
Mitered cuts were necessary here to compensate for not only the height difference between the laminate flooring and carpet because of the transition, but also the rounded corner bead that was used on the outer corners of the walls.
So, once the framing is done and the electrical, ventilation and plumbing have been mapped out and implemented, the insulation is inserted between every joist and sealed up behind the poly.
The drywall is hung and taped and corner bead is carefully placed with precision at every adjoining corner. The drywall mud is then sanded, and everything is primed and painted. With the lighting fixtures secured, the flooring is completed and things are really starting to take shape. The doors and jambs are hung, and only the final touches remain. But not until the trim installation does the project truly look finished.
Like the border of a picture frame and photo within, the trim you choose can greatly vary the outcome of a room design. The colour, size and profile each suggest a different intention. Generally, "trim" refers to one of two main features of any room: the casings around doors and windows and the baseboards along the floor. Crown mouldings along the ceilings are popular, but not every house has them. And wainscoting, which appear as floor-to-hip-high panels along the perimeter of the walls, or the simpler chair rail (a hip-high moulding), are even less common.
Beyond the choices you must make, the installation can sometimes prove to be just as challenging. With measuring tape in hand, the two main tools required for proper trim installation are the compound miter saw and the pneumatic or air nailer. Remember — always measure twice and cut once!
Casings
The shape of doors and windows makes the installation of the trim fairly simple — generally, all trim elements will meet at 90-degree angles. Therefore, the mitered cuts of each adjacent trim piece will be a 45-degree cut. The setback of the casings along the door jamb or window frame is important — best to keep things consistent. I like to use ¼ inch as a rule. For the door, the two vertical trim pieces will be ¼-in. longer than the inner measurement of the door jamb. The top horizontal piece, however, must be ½-in. longer than the inner measurement to allow ¼ in. on each side, where it meets the vertical trim. For windows, each of the four trim pieces that surround the window should be ½-in. longer than the inner measurement of the window frame, to allow for the ¼-in. setback at every mitered joint. At my place, I got to "cheat" a bit when installing my door and window trim. My doors and windows have rosettes at every corner, which allows for straight cuts at every joint.
Before nailing each of the trim pieces in place, to either the door jamb or window frame, fit the pieces together to ensure that everything is square. Using the air nailer, attach the first trim piece in place with a single nail. Attach the second piece ensuring the mitered cuts are perfectly aligned, and so on. You will often notice discrepancies with the square of door jambs and window frames — the ¼-in. setback will usually render these slight variations insignificant once the installation has been completed.
Baseboards
Once the casings have been installed around the doors, the baseboards can be installed. You may have noticed that the casings’ thickness exceeds ever so slightly that of the matching baseboards. And the baseboards are slightly wider than the casings. Casings are a dominant feature, and stand out because they are always at eye level. Baseboards sink back slightly from the meeting point at the base of a vertical door casing, because they are thinner — that’s what they should do. And although baseboards are always at a more distant viewpoint due to their proximity to the floor, their wider attribute compensates for this, giving us the illusion of consistency. If you were to use casings as baseboards, you would quickly notice that your border along the floor seems a bit too thin.
The installation of baseboards is very similar to casings in that most walls join at 90-degree angles. However, the mitered cuts are no longer along the face of the trim — they must be cut along the thin edge of the trim. It takes some practice, but getting the hang of it shouldn’t take long. When measuring, remain aware of inside and outside corners. When cutting an inside corner, the miter cut angles within the measurement. When cutting outside corners, the miter angles from the measurement, rendering the baseboard longer than the measurement. It gets even more complicated when the floor is not perfectly level, such as the floor of a basement with grade to a floor drain. Hence, the term compound miter saw. For cuts such as these, it is necessary to introduce the 45-degree miter at the thin edge of the baseboard end to a slight degree off straight on the face of the baseboard — yes, it gets tricky! I suggest you take a piece of scrap baseboard, and scribe a cut line as best you can. Once you have determined the exact compound miter angles, you can then make an official cut to proper length on the actual baseboard trim piece to be used.
Although caulk can be used to "cheat" a bit by filling in any gaps or cut flaws when installing trim you intend to paint, the installation of natural wood trim is less forgiving. A tip — keep close watch of your miter saw’s angle settings, and confirm these settings before each cut.
Crown mouldings
There really isn’t enough room in this column to describe the miter cut settings for proper installation of crown mouldings. I can reveal, however, that they tend to be somewhat difficult to achieve successfully, even if your walls meet at perfect 90 degree angles.
For example, if the crown moulding is being set along the ceiling at a spring angle of 45 degrees (this means the moulding rests on along the ceiling at a 45-degree angle, and along the adjacent wall at a 45-degree angle), the miter angle on the table of your saw must be set at 35.3 degrees, and the bevel which is the tilt of the blade is set to 30 degrees.
It gets even more complicated if the ceiling meets the wall at slightly greater or less than 90 degrees, or the walls themselves do not meet at perfect 90-degree angles. Furthermore, some crown mouldings are installed at different spring angles — yikes! Luckily, detailed charts which indicate settings for a multitude of variations can be obtained quite easily. The installation of crown mouldings is not for the faint of heart.
Chair rails
Much like the installation of baseboards, the same principals apply. Chair rails are simply baseboards that appear on the wall, partially up from the floor, at hip level and in a horizontal manner along the perimeter of a room. Although less elaborate than wainscoting, it can be a nice addition to the design of a room, and allow for a variety of painting possibilities — this type of trim splits the room into a bottom portion, and top portion of the room.
Most projects require straight forward trim installation. There are, on occasion, certain design aspects of a room which involve more complicated trim solutions. Ultimately, there is always a way to finish a project with the proper trim. Sometimes it just takes a bit more effort to get the job done. When trim is properly installed, it performs its duties by enhancing the room without calling attention to itself.
Compound miter saws can be quite dangerous — so please be careful.
BossEnterprise@outlook.com