The challenge when readying an old deck for a composite upgrade is ensuring the existing structural components of the old framework meet the composite top-decking requirements for proper installation. Typically, a lumber deck will be framed with 2×8 joists set on 24-inch centres, standard when using 2×6 top decking treated lumber. And as expected, this indeed was the case at a recent rear deck upgrade project. Unfortunately, most composite top-decking requires 16-inch on centre joists.
Once the old deck was stripped of all top decking, as well as all stair tops, the existing framework was inspected to ensure no joists were rotten in vulnerable areas. If such was the case, any bad joists could easily be replaced before the new tops are installed. The stair stringers were also reviewed for wear and tear. Luckily, the joists all remained integral. And beyond leveling and properly securing the stairs at the far side of the deck, the framework had faired quite well throughout the years.
To address the issue of the current joists at 24-inches apart, and the 16 on-centre required by the new composite top-decking, it would have been impractical to displace any of the existing joists to lessen the gap. As such, I decided to introduce new joists between the existing, creating a joist system with 12-inch on centres, exceeding the composite requirement. Although the top decking installation process would take longer due to the extra joists, the time will have been offset by not having to adapt any of the existing framework.
Once the new joists were mounted between the existing joists, a similar approach was used to adapt the stairs, which had also been built originally with stringers at every 24 inches. Again, adding extra support between every stringer was far easier than manipulating the existing build to meet the 16 on-centre composite top decking requirement. At every 12 inches, both the stairs and the top deck surface will now be extremely well secured, and rigid.
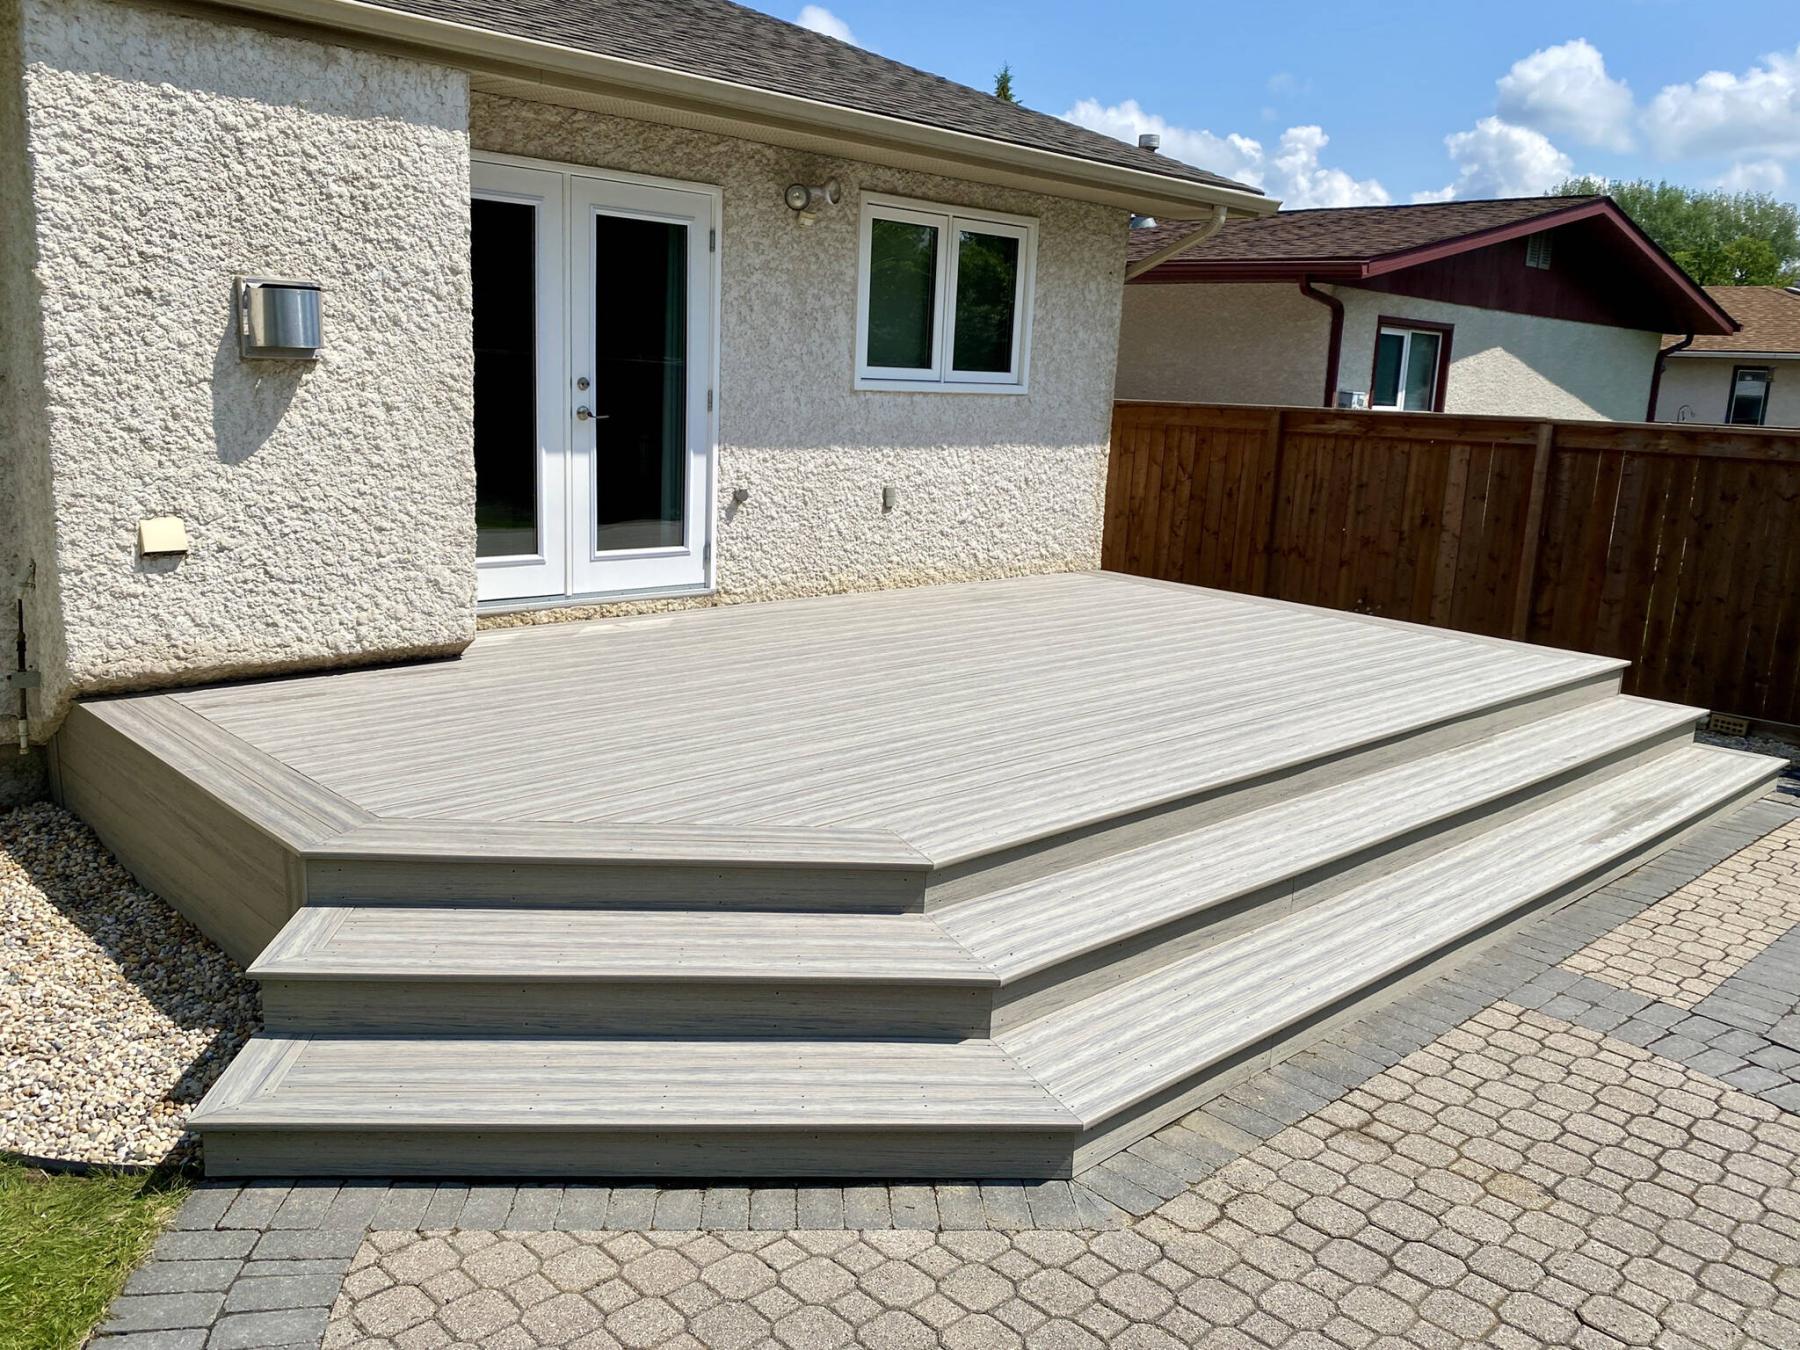
With the old structure now prepped for the new composite installation, 12-inch fascia boards were mounted along every visible face on the main deck, and along every stair. The boards were ripped using a table-saw to meet the height requirement of the stairs, whereas the full width of the facias was used in a horizontally stacked manner along the main sides of the deck. Solid 20-foot top decking boards were then cut and mitered at the corners to create a picture-frame along the top edge of each stair. The inner boards (two were used to create a longer stair run) were placed as straight cuts at the stair-end picture-framing, mitered to create the 45-degree angled area before the long run of each stair towards the far end of the deck. Once the stair tops were properly secured to the stringers below using counter-sunk composite deck screws, a doubled picture-framing using solid boards was then installed along the perimeter of the entire deck, mitered to meet the angle at every corner.
Once all solid boards used for picture-framing were in place, the grooved boards were then set within the picture-framing, parallel to the back of the house, starting from the outer most area and working towards the house. These boards are fastened at every joist below using specialized clips that use wings set within the grooves of the boards, which conceal the securing process. The clips also regulate the gap between boards, providing a consistent spacing of the composite top decking. For the last board, the table saw is used to rip the board to the required width to meet the backside of the house, while maintaining the proper gap from the previously secured board.
Despite the nominal number of additional tasks to ready the old framework for composite top decking, the old structure has truly been renewed, surpassing it’s initial glory. The chosen composite, a Deckorators.ca product called TUNDRA is a light-coloured two-tone grey with a textured finish. Cool to the touch even on the sunniest and hottest days, this deck facelift is sure to bring the homeowners much joy for many years to come.
RenoBoss.Inc@outlook.com