Renovation & Design

Renovation & Design
Methods of replacing exterior insulation can vary
QUESTION 1: We are planning to install some type of cement-board siding on our house in the spring. When we do this, we would like to add a layer of insulation to the outside of the house prior to installing the new siding. I have two questions. First, is there a problem with how my house breathes if I install an inch or two of Styrofoam insulation? The windows are framed for two-by-four construction. What is the best way to build out the windows to meet the new thicker wall?
— Thanks, Kurt Hangle
Question 2: My daughter has hired a contractor in Winnipeg to remove stucco and replace it with siding. He claims that the Styrofoam insulation, if taped, negates the requirement for using house wrap over the insulation. Is this standard or is the wrap required to do the job properly?
— Thanks, Ted Chambers
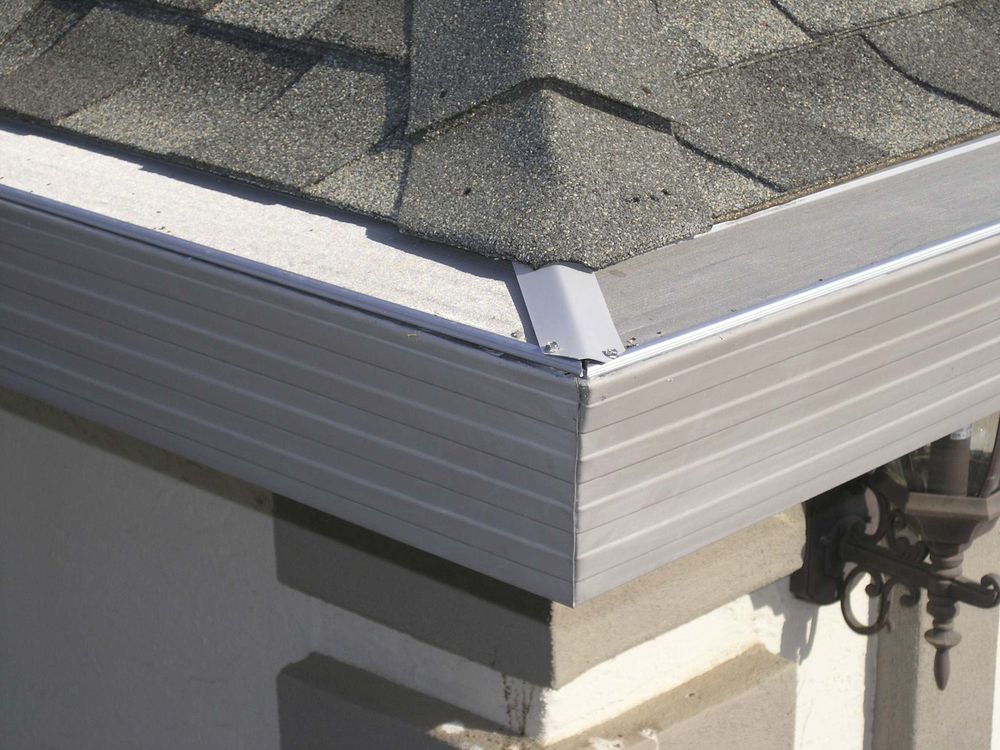
Answer: Both of these questions relate to installation of rigid foam insulation on the exterior walls of a house during replacement of siding. This is now a common method for upgrading the insulation and comfort of older homes and is an excellent idea. There is little concern with this method, and while installation practices vary between contractors, the answers to some of your questions may depend upon the requirements of the local building officials, which you can inquire about yourselves.
Adding a layer of rigid extruded polystyrene (XPS) foam insulation, or equivalent, on the exterior sheathing after removal of older siding is an excellent way to prevent heat loss, while minimizing cold air intrusion through previously drafty walls. There are some challenges, such as the point raised about building out window and door frames, but these are certainly manageable.
In the past there had been concern with trapping moisture inside the exterior wall with this insulation method, but that has not proven to be a valid issue. Recent studies have shown that putting insulation on the exterior of the building enclosure actually warms the exterior walls so much that warm air leaking in from the living space may never reach its dew point. In that scenario, in a home with normal relative humidity, even in the coldest weather condensation won’t occur inside the wall cavity. So, some air leakage into this area will not be serious enough to pose any moisture-related issues or significant rot.
As for the question of furring out the windows and doors, that will depend on the thickness needed to properly extend beyond the new insulation and siding. If the older siding or stucco that is removed is similar in thickness to the new materials, then the depth of the brick moulding extensions should be approximately the thickness of the insulation. If the newer siding is thinner than the old material, and the brick moulding is currently extending more than an inch beyond the existing material, minimal additional material may be needed. In that case, simple wood mouldings could be nailed to the trim to ensure it’s properly extended beyond the new siding.
If the older stucco or siding is considerably thinner than the new material, or if strapping is required over the foam insulation for nailing strips, then thicker wood is required. This could be done by doubling up the brick moulding, or ripping two-inch-thick dimensional lumber to the proper width to extend the brick moulding, jambs and sills. Don’t forget to install new drip flashings above, and if needed below, all doors and windows. And if you have vinyl or other composite windows, then a more complex process may be required.
To determine if new house wrap or building paper is required over top of the additional XPS insulation, you may have to do some more investigation. If the removal of the older stucco or siding does not damage the original building paper, and it has not deteriorated over time, you may not need the house wrap, as it serves essentially the same purpose. This also is dependent on the specifications of the new siding materials.
If the new siding is cement board, or other types that have butt-end joints, you may need the house wrap to protect the XPS from sunlight. The ultraviolet light may penetrate through these small cracks, and cause premature deterioration to the foam insulation over time. If the new siding is stucco or masonry in nature, it will need the thin membrane to prevent adherence directly to the insulation.
The final determination of the need for building paper or house wrap may ultimately depend on the local building officials and their interpretation of the National Building Code (NBC).
Specific methodology for replacement of older siding, while retro-fitting exterior foam insulation, will depend on a few factors.
While there is little concern with condensation and moisture damage to the wall cavity after insulation upgrades, the type of window extensions and need for house wrap will be contingent on local building codes and what is already existing on the homes.
Ari Marantz is the owner of Trained Eye Home Inspection Ltd. and the past president of the Canadian Association of Home & Property Inspectors — Manitoba (cahpi.mb.ca). Questions can be emailed to the address below. Ari can be reached at 204-291-5358 or check out his website at trainedeye.ca.
trainedeye@iname.com

Renovation & Design
Putting rice in salt shakers helps combat moisture
QUESTION: I have often noticed that restaurants have grains of rice in salt shakers. Is this for good luck or a joke that someone plays on the waitress?
— Ben
Answer: While some people consider the following a myth, here is the reason why many people add rice grains to shakers. A few grains of rice added to salt shakers is a great way to prevent salt from clumping because rice is said to absorb moisture.
Did you know many people believe the cure for hand-held devices that accidentally become wet is to leave them in a bowl of rice for several hours to absorb moisture? I have tried this, and after leaving my wet iPhone in rice for two days, the phone worked again.
Question: Thanks to a lazy dog owner, I stepped in a pile of you-know-what and I didn’t notice until the following day. After cleaning the mess up, the smell is lingering. The sole is a rubberized material used on walking shoes. I have scrubbed with a variety of products, but I cannot get rid of the smell. Do you have any suggestions?
— Leslie
Answer: Toss the shoes in the washing machine and wash with heavy-duty detergent and hot water. If the shoes are not washable, scrub the bottom sole with an old toothbrush, water and quite a bit of whitening toothpaste. Soak the bottom sole in 50/50 vinegar and water.
Question: Whenever I bake apple pie, the crust ends up with a soggy texture. What can I do to prevent a soggy crust?
— Pearl
Answer: Before you make your next hot apple pie, cook the apples slowly first over low heat for 15 minutes. Add sugar to the apple slices. Doing this will extract some of the juices and make the crust less soggy. Choose Granny Smith apples — they are perfect for apple pie. Another trick is to peel and cut the apples and then place them in a bowl. Sprinkle with lemon juice, brown sugar, white sugar, salt, nutmeg (optional) and cinnamon (according to the recipe). Leave at room temperature for one to two hours. This allows the apples time to release their juices. Strain the liquid before adding the apple mixture to the crust, let apples drain for an 15 additional minutes. Continue to follow the recipe as directed.
Tips for storing apples
â If you are planning to store apples for an extended period, wrap each unwashed apple individually with a piece of newspaper and store inside a box in a cool dark place, such as the basement, refrigerator or your pantry. The newspaper prevents the apples from touching one another, thereby protecting each apple.
â Bruised apples should not be stored for longer than a few days. Either use them right away or make them into apple cider, apple pie filling or applesauce. If the apples are to be eaten within a few days, store them in the fridge away from carrots and potatoes.
Note: Every user assumes all risks of injury or damage resulting from the implementation of any suggestions in this column. Test all products on an inconspicuous area first.
Reena Nerbas is a popular motivational presenter for large and small groups. Ask a question or share a tip at reena.ca.