Renovation & Design


Renovation & Design
SOLUTIONS: Paint-stain problem requires elbow grease
QUESTION: I have a problem for which I have not seen a solution. I hired professional painters for a not-too-large room in my home. They arrived with a stack of drop-cloths but I think they were not careful in using them. As a result, I have paint splatters in five different spots and one stain that looks like someone dropped a paint brush and then stepped on it. Unfortunately, I didn't double-check the work immediately and they took the money and ran.
I managed to remove the simple splatters by trimming the surface nap of the carpet. The larger stain is another story; I tried soap and water, and some commercial cleaners and, while it is a bit better, it's still very obvious.
It's been a week since they were here and I waited for them to come back to address the issue. In spite of repeated promises to return, of course it didn't happen. So the stain has had a week to set. Help! Marjorey, Winnipeg
ANSWER: Your best bet is to soak the area with paint thinner and water. Leave for 30 mins. and scrub with a brush, repeat until stain is gone. Be sure to test the paint thinner on carpet first to confirm that the dye is not affected. Your chances of getting rid of the stain are good. Complete the process by scrubbing with dish soap and water, rinse and let dry.
QUESTION: I bought a pair of fleece lined jeans and am finding the dye is coming off on my hands when I wear them. I have washed them inside out in cold water and also washed them with 1 cup of vinegar in cold water and they are still making my hands navy from the dye. Is there another way of washing them to get rid of this dye! Bev, Winnipeg
ANSWER: This may be the result of defective dye but most likely will cure itself over time by getting rid of the excess dye. Here are a few hints to help speed up the process of making your jeans colorfast. Soak the jeans for a few hours in plain old straight white vinegar. Next wash them in the hottest water possible (you can use cold water but the color setting process will take longer). If the dye is still not colorfast, bring the jeans to the store and explain the situation.
Fabulous Tips of the Week
-- Get rid of a squeaky car door by rubbing the hinges with petroleum jelly.
-- Make a tool wrap with the help of an old pair of jeans. Cut off a 10-inch section of one pant leg, measured from the bottom hem. Rip the inseam out but leave it attached at the hem. Place the fabric on a flat surface, inside facing out. Put tools on fabric, fold closed, roll up, and tie with the inseam.
I enjoy your questions and tips, keep them coming. Missed a column? Can't remember a solution? Need a speaker for an upcoming event? Check out my brand new blog/website: reena.ca!

Renovation & Design
SOLUTIONS: Lose the lipstick on fur hat
QUESTION: Can you please tell me how to get lipstick out of a white rabbit-fur hat? Many thanks. Moira (Oakbank, Man.)
ANSWER: Get a hold of a bottle of waterless hand cleaner. It is available at hardware stores. The beauty of this product is that it does not require water (water may damage the fur) and it is made to cut through grease -- in other words, lipstick. Test the waterless hand cleaner on an inconspicuous area first before using it on the visible parts of your hat.
QUESTION: Would you know what we can use to remove a blue stain from a padded toilet seat? We just purchased the seat a couple of weeks ago. We're not sure what the blue is from but would appreciate any help you can give us. Thanks, Joan (Winnipeg)
ANSWER: The question that I am wondering is what caused the blue stain? If the stain is crayon or something sitting on the surface of the seat, you should be able to remove it with toothpaste, water and an old toothbrush. If the stain was caused by blue toilet cleaner, the seat is likely dyed and therefore not reversible.
QUESTION: We are travelling extensively through the United States and Canada, staying in hotels and motels. Is there a product that will not harm us that we can put in our suitcases and/or bedding that may guard against bedbugs? Thank you, Peter (Winnipeg)
ANSWER: Here are a few tips and effective ways to reduce the risk of bedbugs while travelling:
-- Do your homework. It's worth your time to go online and read hotel reviews. You can also call the hotel to make sure they are not currently battling a bedbug infestation. Don't assume that five-star hotels are free from bedbugs.
-- Use luggage racks set away from the walls instead of placing luggage directly on the bed.
-- Pack your travel items in sealed plastic bags. When you return home, freeze suspect items for at least two weeks.
-- After returning home and washing items, dry them on the highest heat possible.
-- If you're really worried about bedbugs, you can cover the hotel bed with a plastic cover. The idea behind this is that bedbugs will suffocate and die. This method is extreme, but if you sleep better at night it will be worth it.
Good night and don't let the bedbugs bite!
Fabulous tip of the week
-- An alternative to baking round pies: Roll pie crust onto a rectangle baking sheet. Add filling and cover with second pie crust. Bake as normal, let rest. Cut into squares.
I enjoy your questions and tips, keep them coming. Missed a column? Can't remember a solution? Need a speaker for an upcoming event? Check out my new blog/website: reena.ca!
Renovation & Design
ASK THE INSPECTOR: Cool floor by bay window needs extra insulation
QUESTION: Our house was built in 2009 and has a bay window which juts out from the foundation in the living room. We've noticed the floor near the bay window is very cold even though there is a heating vent in the floor directly below the window. The window faces west.
Is there anything we can do to improve the amount of heat we get in this area of the living room even though there is no foundation beneath it? Any advice you could give us would be most appreciated.
Thank you, Elaine Lafleche
ANSWER: The problem of having cool floors under bay or bow windows and alcoves is a very common one. Because it is difficult to properly insulate and air seal these areas without filling the cavity, getting sufficient heated air in to warm these areas during the winter months can be tricky.
Because of attempts to build modern homes with various cantilevered floor-joist areas, alcoves for china cabinets and bay or bow windows, a cooler floor in these areas relative to the rest of the home is an undesirable consequence. New homes require elevated levels of thermal protection in the walls and basements in the form of insulation, so anything that strays from a simple format can be tricky to deal with. Cantilevers, which are areas where the floor extends beyond the exterior of the foundation walls, fall into this category. The reason for this actually begins in the basement at the junction of the foundation and the floor.
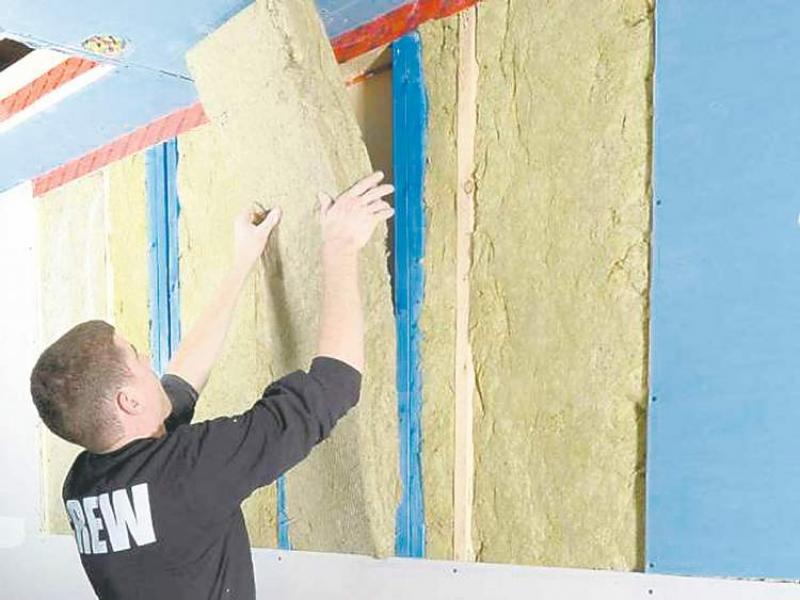
In a straight-forward home design, where the ends of the floor joists sit near the outside face of the foundation walls, it can be quite simple to extend the insulation from the perimeter basement walls straight up to the underside of the floor sheathing. This is often done by cutting and stuffing in smaller pieces of the same fibreglass batts used to insulate the walls between the floor joists. Six-mil polyethylene sheathing, used for an air/vapour barrier over the walls, is extended up between the joists and normally caulked and stapled to the insides of the joists and underside of the floor sheathing.
This method creates a fairly uniform, continuous layer of insulation from the basement floor slab right up to the highest ceilings. When it's done properly, there are should not be many gaps for cold air intrusion from outside, or large areas where heat can be lost due to a phenomenon called "thermal bridging."
However, when a section of the floor is extended beyond the foundation wall, the uniformity of the insulation at the building envelope goes out the window. To properly insulate and seal this extension, the air/vapour-barrier installation becomes much more difficult. Because the air seal has to be installed on the warmer side of the insulation, the transition of the poly sheathing from the basement walls to the cantilevered floor is tricky.
The solution is often to simply stuff the entire cavity extending beyond the foundation with insulation after the air/vapour barrier and sheathing have been put in place above. This solves the dilemma with the poly, but it leaves little room for warm air to infiltrate the heavily-insulated floor cavity.
So, while it will prevent excessive heat loss through the cantilevered floor, it will also prevent heated air from the home entering the cavity. Combined with thermal bridging through the floor joists, which are almost directly exposed to the cold outside temperatures, it will make the floor surface feel cooler than the surrounding floor.
Because your problem is created by a lack of room for warm, heated air to circulate between the floor joists, we have to find a way to allow that to happen while maintaining a proper level of insulation. The two possible solutions both require removal of the existing batt insulation and replacement with better choices.
The first possibility is to insulate the cantilevered area from the outside, rather than inside. This may be easily done on the underside by simply removing any stucco or parging to expose the sheathing. Fastening and caulking a couple of layers of rigid extruded polystyrene sheathing in this area should do the trick. It may not be possible to extend this to the ends and sides of the joist areas from the exterior, so more sheathing could be installed on the interior faces in those two areas.
While this does not leave a perfectly continuous air/vapour barrier, if it's well-sealed by caulking, it may prevent enough air movement to suffice. Otherwise, the sheathing underneath the cantilevered area could be removed and the foam board installed all from the underside, which would make a tighter seal.
The other method, probably less labour-intensive, but requiring more costly insulation, is to blow a layer of high-density foam on the inside of the bottom cantilever sheathing and inside the perimeter joists. The benefit of this method is it may not require removal of anything on the exterior. The downside is it may leave less of a cavity for warm-air intrusion than exterior insulation.
The ultimate remediation could actually include a combination of rigid foam sheathing on the underside of the problem area and blown-in material on the inside faces of the perimeter joists. If done properly, that method could ensure excellent air/vapour barrier contiguity, with a maximum warm-air cavity underneath the floor sheathing.
While all this may seem complicated, the simple underlying principle to remember is you need sufficient thermal insulation to prevent excessive heat loss around the perimeter of the cantilever, while maintaining enough open air space under the floor to let warm air circulate.
Ari Marantz is the owner of Trained Eye Home Inspection Ltd. and the President of the Canadian Association of Home & Property Inspectors - Manitoba (www.cahpi.mb.ca). Questions can be emailed to the address below. Ari can be reached at (204) 291-5358 or check out his website at www.trainedeye.ca.
trainedeye@iname.com