Renovation & Design
Renovation & Design
Don't forget the alarm system
Great tips for homeowners are offered on the HGTV network. I especially enjoy watching the renovation shows.
Homes opened up and stripped down to bare studs. New wiring, drywall, vapor barriers, heating ducts, and a host of other improvements centered on environmentally friendly technology.
Granite countertops, hardwood floors, stainless steel appliances, crown mouldings and quality cabinets combined with the right amount of camera angle to produce the final “pop” for viewers.
It’s great to learn about effective barriers that safeguard against fire, mold, fungus and rot but what about effective barriers that safeguard against “the bad guys?”
If you’re tuning into these types of shows and are planning an extensive renovation, don’t forget about your family’s safety once you hit the studs.
The costs to install even the most elaborate security system are greatly reduced when working at the pre-drywall stage.
If you’re building a new home or planning a renovation, the installation of your alarm system should be done in two stages.
The first stage is the pre-wiring which is usually done in one day before the sheet-rock covers the walls. This is where the wires are run through the studs and ceiling for all the openings (windows and doors), as well as motion sensors, smoke sensors, keypads, security cameras etc.
Always speak to your installer before he begins the pre-wire to make sure he knows exactly where he’s running the wires. You don’t want to jeopardize your home’s security because your installer missed out on crucial areas that need protecting.
If you want an intercom system or security camera installed, economically now is the time to do it. Even if it’s not in today’s budget, run the wires and add the hardware at a later date.
Make sure your alarm installer is the last person to work within the walls and ceiling because you don’t want other trades like plumbers, electricians or heating specialists disturbing the pre-wire.
Your installer should make sure the security wiring is kept away from any other wiring as well as plumbing pipes and areas that may collect moisture. This will help prevent a short down the road, or worse yet a fire.
The second stage of your home alarm installation follows the drywall. Once all the doors and windows are in place, the installer can complete his work.
This involves installing motion detectors, smoke and glass break sensors, keypads, internal and external sirens, a control box and any other add-ons you allowed for.
Somebody asked me the other day, ”How can I tell if my new home’s alarm system has been wired to the industry standard?”
The industry uses a term called “Home run” which means all windows, doors, motion detectors, glass break sensors, water sensors and key pads have individual dedicated wires running back to one panel location.
With the soaring cost of copper wire, some alarm companies are having their installers save money by “looping”. This means one wire will leave the panel location and go to the first window, and then another wire will continue to the next and so on. This cuts down on the amount of wire required for the install.
The danger of this type of installation comes when there’s a problem with one window in the circuit; all the attached doors or windows will be affected causing multiple security breaches.
If you’re concerned about whether your security system has been installed properly, here’s how you can check. Count all the hardware (detection devices) you have installed in your home. I’m referring to the contacts on all the windows and doors, motion detectors, glass break sensors and so on. After you have a number in your head, go to the main panel (usually in a closet or out of the way location) and count the number of wires. There should be a telephone wire and a wire for every connection to the system with possibly a few spares for future add-ons.
www.yourhomesecurityca
Renovation & Design
October is Renovation Month across Canada
For 20 years, the Canadian Home Builders’ Association has been promoting October as Renovation Month across the country. It is the only nation-wide marketing campaign dedicated exclusively to Canada’s renovation industry.
In addition to the national campaign, each local home builders’ association develops its own unique way of promoting the industry. The Manitoba Home Builders’ Association is also extremely proud of the excellence of the renovation industry and the members promoting it.
In Manitoba, our annual Renovation Awards are in full swing. This year, we are proud to present 27 separate renovation projects by seven professional renovators. Judging by a panel of experts will take place next week with the RenoMark Renovator Awards Night on Friday, November 2.
Manitoba has always been the leader in home renovations in Canada and the market continues to be strong here. Given that Winnipeg has the 3rd oldest housing stock in Canada, home renovations are an important component to our residences.
New ideas are featured at the Fall Parade of Homes and the tens of thousands of visitors look to see how they can incorporate new designs, colours, features and materials into their existing homes. Suppliers to the new home industry brought out their best during the Parade and now consumers want to know how they can update their homes with a renovation.
So, in reality, every month is Renovation Month in Manitoba.
The Winnipeg Free Press has joined in the promotion of Renovation Month with a helpful insert in today’s paper directed at those considering renovating their home.
As always, the Manitoba Home Builders’ Association and our RenoMark renovators urge everyone to get your renovation agreement in writing. Make sure that your contractor outlines all costs in advance so that both parties know what to expect.
If you are at all in doubt as to what to ask and what to look for in a renovator, go to the MHBA web site (www.homebuilders.mb.ca) and click on the RenoMark logo or directly to the RenoMark web site (www.renomark.ca) and follow the guidelines posted.
Enjoy your renovation experience and your “new-looking” home.
Mike Moore is president of the Manitoba Home Builders’ Association.
Renovation & Design
Solution for removing wax from fabric safely
QUESTION — One of my daughter’s winter gloves has melted wax on it. It is made with nylon fabric and has faux fur trim on the edge. I don’t want to wash it in the machine. How can I remove the wax? Celeste (Arborg, MB)
ANSWER: Soak the glove in a pot of boiling water. Make sure the faux trim does not get wet. A good way to ensure no heat touches the fur is to position a plastic bag over the fur and secure with a rubber band. Boil the glove for at least five minutes. The wax will soften and release from the fabric. Air-dry.
QUESTION: My mother-in-law recently passed away in a nursing home. Her clothing, mostly stretchy things, has iron-on name tags in the back. I would like to know if there is any way to remove these tags without damaging the fabric. Thanks for any input you are able to give. Sandi, Winnipeg
ANSWER: Sorry for your loss, Sandi. Regarding the clothes, begin by lifting a corner of the label and heating it with a hair dryer. This works well to loosen glue, making it easier to peel labels. Other products to use are: citrus oil, rubbing alcohol, Goo Gone or if you are desperate, WD-40. Spray onto the label, leave for 15 minutes and peel. Soak fabrics in dish soap to wash away the odour. Test all solutions on an inconspicuous area first.
QUESTION: I like to use butter when I make grilled-cheese sandwiches but I store my butter in the fridge. When it comes time to make the sandwiches, the butter is too hard. Any substitutes other than margarine would be greatly appreciated. Wayne (Russell, Man.)
ANSWER: Spread bread with mayonnaise instead of butter. It’s so much easier and the flavour is delicious. You will notice that each sandwich comes out nice and crisp.
Baked Christmas gift idea:
Dear Reena,
This recipe was given to me by my aunt whose great-grandmother passed it down in their family in Austria! Takes a long time, but they are delicious! Loraine, Winnipeg
Cinnamon buns
Combine 1 tsp. sugar and half-cup lukewarm water; allow to stand until yeast is fluffy. Scald 11/2 cups milk and then allow it to become lukewarm. Then add milk to yeast mixture and mix well. Add two to 21/2 cups flour to make a batter that is quite thick. Cover with a damp cloth and set in a warm place until the mix is light and full of bubbles. Let the foundation sponge rise until light and bubbly. Beat until smooth. Cream a half-cup of butter and half-cup sugar and three eggs together. Add to sponge and beat well. Add one cup of flour and 11/2 tsp. salt. Mix well. Add additional flour to make soft dough. Add 1-2 cups washed plumped raisins (optional). Knead until smooth. Round up dough, place in ungreased bowl and cover well. Let rise until double. Knead and let rise again. Punch down and cut into four sections. Roll out and spread with butter. Add cinnamon and brown sugar, mixed together (I use a lot of both). Roll up and let rise again. Bake in greased large bun pan at 350 degrees. For faster rising, add 2 tsp. sugar and 2 tsp. yeast. Do not skip any of the risings.
Pumpkin spa tips of the week:
â A great way to use up leftover pumpkin is to make a gentle scrub that will exfoliate your skin. Pumpkin face mask recipe: In a bowl, mix together one quarter cup pumpkin purée, one quarter cup coconut milk and half-tsp. ground cinnamon (not cinnamon essential oil). Apply to skin and leave on for 10 minutes, being careful to avoid eyes. Rinse with water and pat dry.
â Pumpkin hand moisturizer: In a bowl, blend half-cup canned pumpkin puree, 2 tbsp. honey and 2 tbsp. margarine. For smooth skin, cover hands with mixture and rinse with water after 20 mins. Pat dry,
I enjoy your questions and tips, keep them coming! Missed a column? Can’t remember a solution? Need a speaker for an upcoming event? Check out my brand-new blog/website: reena.ca
Renovation & Design
ASK THE INSPECTOR: Older low-pitched roofs present challenges
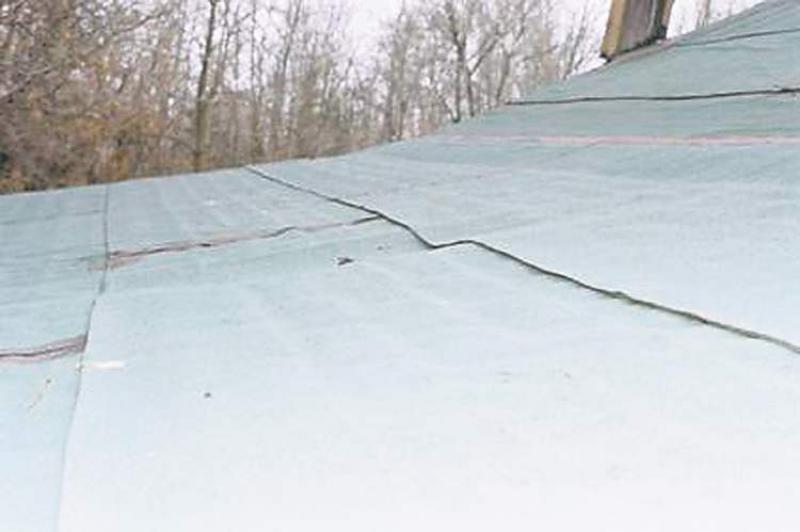
QUESTION: We have a low-pitched roof that is covered not by tar and gravel, but a polyurethane foam covered with a polymer coating. Our problem is there is no vapour barrier in our ceiling, other than this roofing material itself. We discovered this when our eavestroughs were damaged and allowed water into the house, necessitating the removal of part of a wall. Since moisture can pass through the drywall ceiling into the roof space, the moisture seems to collect and, during the winter, it freezes there. Come spring, this moisture buildup melts and seeps down the exterior walls, staining the stucco.
Does this need to be fixed, and how soon? If so, how can this be fixed, seeing as the roof space is only about 20 centimetres deep? Stacy Swanson
A few years ago I purchased a bungalow, built in 1962. The roof has a very low slope and is approximately 1,600 square feet in size. It is covered with tar and gravel and appears to have been resurfaced at least once in the life of the house, with the second layer being placed on top of the original. It appears the only roof insulation exists on top of the decking, under the tar and gravel.
The inside of the house is all cathedral ceilings, with half of it being exposed beams, the other half Gyproc, with the ceiling about 20 centimetres lower than the exposed-beam half of the house. The roof has had extensive ice jams in the past, and a few areas on the roof are quite spongy. I intend to have the roof replaced with the torched-on membrane for low-pitched roofs recommended to me. I have asked the roofer to install the appropriate insulation.
The existing old roof has no ventilation whatsoever. I was told by the roofers that no ventilation is required, since the insulation is on the outside of the roof decking, under the torched-on material. Is that correct? I have always been led to believe that venting a roof is important. Peter Mingo
ANSWER: Low-pitched roofs on older homes often provide significant challenges for homeowners as they age and deteriorate. You both have similar situations, with different approaches to the roofing materials, but also with ice damming and moisture problems common to this style of home.
The more traditional tar and gravel roof is actually a series of thin layers of roofing felt, or impregnated paper, individually coated with hot tar. This provides a built-up roofing system that is durable and moisture-resistant. The rock cover is installed simply to protect the roofing from damaging ultraviolet light from the sun and mechanical damage from fallen debris or human traffic.
The other home, with the more modern blown-on foam insulation, has a thin membrane coating sprayed or mopped on to waterproof the surface and prevent deterioration of the foam from the elements.
Because both of these applications have the insulation installed on top of the roof cavity, which is only the space between the ceiling joists, there is no room or need for ventilation from the exterior. Both of these systems should have good air/vapour ratings, but the location of this air barrier is the concern.
If the polyurethane foam is high-density, the inner surface of it may be quite impenetrable to air. But if it's lower-density foam, which may have similar properties in relation to air intrusion to the expanded foam sheathing likely installed in the built-up roof, this may be the source of the problem. Neither of these types of foam will resist warm-air infiltration at the surface, and they can allow a significant amount of heat and water vapour into the insulation itself.
The way to stop ice damming and leakage in both homes is to install insulation with a higher air/vapour rating in the entire roof cavity below the existing insulation. This could be done by cutting several layers of rigid extruded polyurethane sheathing and gluing them between the ceiling joists. Better yet, blow in high-density polyurethane to fill the cavities and prevent any warm-air intrusion.
In the home where the plan is to replace the older, built-up roofing, new insulation can be added when the roofing is removed. For the more modern foam roof, partial removal of the drywall ceiling will be required, or drilling multiple holes, to allow foam installation from inside.
Ari Marantz is the owner of Trained Eye Home Inspection Ltd. and the president of the Canadian Association of Home & Property Inspectors -- Manitoba (www.cahpi.mb.ca). Questions can be emailed to the address below. Ari can be reached at 204-291-5358 or check out his website at www.trainedeye.ca
trainedeye@iname.com
Renovation & Design
SOLUTIONS: Ozone machine will rid home of cigarette smell
QUESTION: We recently purchased a 10-year-old home, which we love despite the lingering odour of cigarettes from past owners. We have repainted, burned candles, simmered cloves and cinnamon on the stove, etc. but the odour persists. The upstairs floors are wood laminate. The finished basement is rug, but the odour is not as strong down there. Do you have any helpful hints for getting rid of this nasty smell? Thanks. Barbara, Winnipeg
ANSWER: You may want to consider renting an ozone machine. This little machine is not recommended for regular use but it is great for enclosed areas that have had smoke or flood damage or just smell. The machine lets out a molecule called O3 (which of course is oxygen with an extra molecule attached). The third molecule escapes into the air and absorbs all odours. These machines can be rented at tool rental retailers as well as some hardware stores.
QUESTION: I had a cedar chest built for my home-sewn quilts. The chest is completely lined with aromatic cedar and now after a few years, I noticed that my quilts show a slight discolouration where they have touched the sides of the chest. I think this may be coming from the natural oils of the cedar, but the makers of the cedar assured me by email before I started storing my quilts in the chest that I should not worry that this would happen.
Should I now wash all my quilts? Some of them are being saved for future wedding gifts etc. Can I continue to store my quilts in the chest without worry? Should I line the chest with some other fabric before I put my quilts back inside? If so, what would you suggest? Delores, Winnipeg
ANSWER: It is not recommended to store quilts in a wooden chest/boxes unless extra precautionary measures are taken. Keep these extra special gifts in the chest, but line it with acid- free paper. And before folding the quilts, crumple up additional acid free paper and tuck it inside of the folds to keep them loose and prevent folds from becoming permanent. If acid-free paper is not an option, loosely wrap each quilt in a white linen sheet.
Since the quilts are gifts, washing them may not be the best solution. In order to remove the brown discolouration on your quilts, purchase a bar of Sunlight laundry soap. Wet the soap and scrub the stain. Rinse and let dry, check brown stains. If stains remain then you may want to consider hand washing the quilts. Dry well before storage.
QUESTION: Can you please tell me how much vinegar to put in a full load of laundry to be used instead of fabric softener sheets in the dryer? Thank you, D.M., Killarney
ANSWER: You can use between one-half to one cup of white vinegar to each load. Adding half cup baking soda to the vinegar will do an even better job at deodorizing your machine and cleaning out the hoses than plain vinegar.
QUESTION: I have a small plastic bird feeder and the suction cups that hold the feeder to the window keep falling off. Any ideas about how to hold the suction cups to the glass? Also, my kitchen window hasn't been opened in some time. How can I open the window without breaking it? It unwinds with a handle at the bottom. Mary, Winnipeg
ANSWER: Suction cups stick best to clean surfaces, therefore if you have not already done so, clean the window and the inside of the suction cup with rubbing alcohol or your favourite window cleaner. Wet the suction cup with either water or hairspray to help it stick.
In terms of the stuck window: As long as there are no screws or nails holding the window down, you should be able to open it. If the window frame was painted, it may stick and sometimes plain old moisture from outside will suction windows making them difficult to open. There are tools for this job known as window zippers but they can be tricky to locate. Sometimes all you need to do is run a utility knife around the perimeter of the window. Or use a flat pry bar to gently nudge the window open. If the window won't budge, it may be warped and professional help should be enlisted.
Feedback from Manitoban who cares:
Hi Reena,
Just finished reading your response on how to keep cheese from getting mouldy. I happened to catch a television segment and the hostess had an expert cheese maker from France talking about different types of cheese. She mentioned that she stores her cheese tightly wrapped in plastic. The expert immediately told her that was the wrong thing to do, and that cheese should be wrapped in wax paper and then stored in foil in the fridge. She was shocked, and since then that is how I store my cheese and I never have a problem with it going mouldy. We also buy the bigger bricks of cheese because they are a better price. It works! Pat, Winnipeg
Fabulous tip of the week:
-- Make your own scrub mitt: With the right sides together, fold a facecloth in half. Sew around the edges of three sides. In less than 30 minutes you have created a functional scrubbing mitt for your body or bathroom cleaning.
I enjoy your questions and tips, keep them coming! Missed a column? Can't remember a solution? Need a speaker for an upcoming event? Check out my brand new blog/website: reena.ca