Renovation & Design


Renovation & Design
Pet fur a magnet? There is help for tops
QUESTION: I love my polar fleece tops and jackets, but they are such magnets for hair and pet fur. The hair/fur stays on the garments even after laundering. Can you suggest some kind of laundry product or method to solve my problem? I don't use commercial laundry softeners in either the washer or dryer, as I am sensitive to smell. Kathy, Winnipeg
ANSWER: You are not alone, Kathy. Many pet-owners refuse to purchase fleece solely because of this challenge. Lint brushes, masking tape and lint rollers are not overly effective because fur becomes imbedded in the fleece fibres. Unfortunately fabric softener in the washer is your best defence against cling-on fur. Of course, vinegar is a wonderful alternative to commercial softeners; use about one cup per load.
QUESTION: We have the Household Solutions book series, but it is in Winnipeg and we are in Mazatlan for the winter. We have Plumbago in our courtyard, a blue-flowered plant which is used in dyes. They are sticky, and a flower got on my pants and then I sat on our cotton fabric couch. We now have a blue mark the shape of the flower right in the middle of a white area.
We have taken the cover off so we can wash it, but don't know the best thing to use. Right now we have toothpaste on it but thought we would ask you. Any suggestions would be greatly appreciated.
Thanks. Ingrid and Frank, Winnipeg
ANSWER: Unfortunately, toothpaste won't cut it because the fibres are permanently dyed as opposed to surface dyed. The great news is that the cover is washable. If you are fine with lightening the entire couch cover, then purchase dye remover or Iron Out and use it according to the directions on the package. This is easy to find at most craft stores. If you only want to lighten one particular area, then remove the couch cover and soak the area with three-per-cent hydrogen peroxide on the blue spot. Wash and repeat this process until stain is gone. Paint thinner is one other option for direct treatment on the flower mark. Enjoy Mexico!
QUESTION: I have a copper chafing dish which is badly tarnished; do you have a suggestion on how to clean it? Pat, Winnipeg
ANSWER: The following hints are effective for cleaning copper: Sprinkle salt on a wet sponge and wipe. Or mix lemon juice and baking soda together. Rub with an old toothbrush. Another option is to smear copper with either ketchup or WD-40, wait 10 minutes and polish.
QUESTION: I want to have a cupcake-making party for my daughter's ninth birthday party. How much batter do I need for 24 cupcakes? Dwayne, Garson, Man.
ANSWER: If you make enough batter for a double layer cake, you will have batter for 24 cupcakes. Fill each muffin liner two-thirds full. If you want to make cupcakes ahead of time, you can freeze unfrosted cupcakes for up to two months.
Did you know the first cupcakes did not have frosting, but instead were topped with lard as a kind of cake-moistening gravy? Winston Churchill was the first person to suggest a kind of sweet frosting on the top of the cakes.
QUESTION: I know you have answered this before in the Free Press, but I am still struggling with this problem.
I bought a pair of burgundy-coloured jeans in Grand Forks last weekend and when I got them home, I noticed a strong chemical smell. I washed them with laundry detergent and hung them up to dry. The smell was just as strong. So next I washed them three times in white vinegar. A little improvement, but still couldn't wear them. Next, I tried borax. No change. Now I am soaking them overnight in the borax solution. Any other ideas? Thanks, Shaun, Ste. Anne.
ANSWER: The smell is a result of dyes and chemicals used in manufacturing the jeans. Soak them in Coca-Cola for a few hours. Wash as usual. In any case, the odour will fade over time as you continue to wash and wear them.
Wonderful Feedback from Caring Manitoban:
Dear Reena,
With regards to your tip about cleaning pots, I want to tell you that a handful of rhubarb (available in the frozen-food section in the winter) does a great job of cleaning a blackened pot (voice of experience). PS: When preparing rhubarb, if you bake it instead of boiling it, the rhubarb won't go mushy. Mrs. R., Winnipeg
Fabulous Tips of the Week
-- Don't dust any cleaning surface higher than your tallest friend.
-- Staying focused while cleaning is important. Set a timer for five minutes and start cleaning, when the times goes off stop cleaning and eat a huge snack to reward yourself.
-- Share the work of cleaning your house by forming a Cleaning Club. Nominate yourself president and supervise while all members clean your house.
-- Company pops over and the house is a mess, inform guests that you are in the process of reorganizing and needed to scatter stuff in every room to figure out the best place for each item.
-- Used facial tissue can be saved as extra stuffing for pillows.
-- Attach clothes to the bottom of your indoor slippers to polish your floors as you walk.
-- Toothpicks can be washed and reused up to eight times.
Reena Nerbas is the author of the national bestselling Household Solutions series. Her website is www.householdsolutions.org You can contact her at Box 429, Blumenort, Man., ROA 0C0.
Renovation & Design
Avoid safety pitfalls during festive season
The holidays are around the corner, and, before you know it, people everywhere will be climbing up on their roofs, battling it out with Old Man Winter just to spread some Christmas cheer. Lights are a huge part of the holiday spirit, but it's important not to wreck your home in the process.
I'm not saying you need to be a Scrooge, but I am saying you need to protect your home. You've invested too much in maintaining a healthy exterior to compromise its integrity over a few holiday lights.
I hate doing things twice, and I'm sure many of you do, too. So before anyone starts drilling through their eavestroughs and nailing through electrical wires (I've seen it all, folks), I thought it would be helpful to give you a pep talk first.
Replace old lights. Cold weather causes the wiring in string lights to become brittle, making them vulnerable to being damaged. The chances of damaged lights/cords increases the longer they stay out during the year. That's why, before climbing up any ladder, it's important to make sure every light bulb is working and the cords aren't frayed in any area. If they are frayed or damaged, don't try repairing them -- replace them. The last thing you need this season is a fire hazard.
Do not overload circuits. Some people want their home to be the neighbourhood showstopper. But a goal like that is likely to blow out a couple of fuses -- a certain Chevy Chase Christmas movie comes to mind.
Prevent this by making sure the receptacle's/outlet's circuit is rated to handle the total amperes of all the lights you plan to use. Most sources will say not to connect more than three light strings end to end, or 300 lights, but in my experience, one rule does not fit all. Check to make sure, every time.
LEDs: I highly recommend using LED lights to anyone. They're brighter, more energy-efficient, and cause fewer fuses to burn out. LEDs mean more light for the same electrical capacity and more sparkle for your buck.
Power stakes: This is an electrical box, usually with three receptacles/outlets, that has a long cord attached to it. The box stands on a stake you drive into the ground. The purpose of a power stake is to bring the power where you need it without running a maze of cords across your yard. They're fairly inexpensive and they keep the outlets above ground. This protects them from precipitation and from being covered by snow. Most come with a circuit breaker and some models even have timers. That's smart.
But just because you have more outlets doesn't mean you have more power. Average circuits usually allow for a maximum of approximately 1,200 watts. You need to keep that in mind. Although some people think installing a power stake is a DIY project, I recommend consulting with an electrical contractor to make sure the outlet into which you plug the power stake is dedicated, meaning there are no other sources drawing power from it, and you stay within the circuit's limits.
Extension cords: Extension cords are for temporary use only. If you're going to use one, make sure it's compatible with your lights and it can hold up to the winter weather. That means the outside jacket of the extension cord needs to be rated for exterior use and the wire gauge must be rated for what you plan on plugging into the extension cord. I'd recommend at least a 14-gauge outdoor-rated extension cord.
Fasteners and clips: Anyone driving nails into cords or attaching lights with staples automatically ends up on Santa's bad list. It's a fire hazard, it damages the cords, and you can seriously harm yourself -- not a happy holiday. In fact, avoid using nails, screws and staples entirely. Why? One, they're conductors of electricity. Two, they rust. And three, they create holes in your home's exterior. Holes allow water to penetrate and eat away at the exterior. Instead, use fasteners or holders made from rubber or heavy-duty plastic, which safely grip the eavestrough or a roof's shingles without damaging them. A lower hook holds the lights/extension cord in place.
Make sure they're strong enough to handle the weight of the cords.
Window fasteners: Hanging lights to window frames using nails or staples damages them because of the holes they create. Holes in window frames allow water to penetrate into the wood, rotting it from the inside. Look for plastic or rubber fasteners with a moisture-resistant, peel-and-stick backing that can be stuck to windows. Try using ones that can hold up to 4.5 kilograms for extra security.
Working outside in the cold makes it tempting to cut corners. Get the work done before the temperatures start to really drop, and you'll be able to appreciate all your hard work from the best viewpoint: indoors with some eggnog.
-- Postmedia News
Catch Mike in his new series, Holmes Inspection, airing Thursdays at 8 p.m. ET/PT on HGTV. For more information, visit www.hgtv.ca. For more information on home renovations, visit makeitright.ca
Renovation & Design
Stuff it
We don't miss the old place, really we don't. And -- so far at least -- we don't miss all the things we got rid of either.
But we are still reeling from the process.
We downsized, you see. Over the summer we went from a spacious three-bedroom house with a finished basement and a two-car garage to a comfortable two-bedroom condo with one parking spot and no outdoor space at all.
It was, for us, the right thing to do. But downsizing, I have learned, is not easy. Several months after the move, we are not yet done.
The biggest challenge is Stuff. With a capital S.
I read somewhere that baby boomers find downsizing difficult because never before has there been a generation with so much Stuff.
I can believe it. Over the 15 years we lived in our house, we filled it to the brim. We "stored" furniture or artwork for friends. We took in the plants of people moving out of town. We inherited things from assorted family members -- sometimes even from the families of friends. And, of course, there was our own Stuff, the things we bought or otherwise accumulated. There's no incentive to get rid of Stuff when you have a place to keep it.
Then, virtually on the spur of the moment, we sold our house and bought a new place that was less than half the size. And we were faced with the realization we had less than two months to get rid of at least half of our Stuff because there was simply no room for it in the new place.
At first it was fun. I gleefully filled garbage bags with things I had kept just because it had been easier to keep them than to throw them out -- such as 10-year-old birthday cards or instruction manuals for appliances that died long ago.
Then it got tougher. I'd open a box and find memorabilia from my childhood, or old magazines, or things with sentimental value. I went through it all, piece by piece, evening after evening. I'd force myself to ask why I was keeping this trophy or that scrapbook.
For the most part, I was ruthless. Most of the memorabilia went. It had to. There was just going to be no room in the new place. My partner and I gave each other permission to keep silly or useless things. But only a few.
Downsizing got tougher still when it came to useful things such as garden hoses (no longer needed), books (no room for them all) and several roomfuls of furniture. I wasn't about to just toss perfectly useful things. We made a list of sellable items and organized a virtual garage sale, sending out an email to friends, family and neighbours. This turned out to be quite successful.
Things we couldn't sell, we gave away. Extra clothing went to charity. We donated an estimated 1,500 books to the library. (How did we ever come to own so many books, I wondered?)
The toughest to part with were the things I thought had value. Like my vinyl records. Surely I could get money for them, I thought. But record stores didn't want what I had. And a venture into online sales sites brought no takers. I was about to toss them when I found someone who would give them a home.
Even with all our efforts, I could tell it was not quite enough. As moving day approached, I grew desperate. I'd put things by the side of the road early on garbage day, hoping they'd disappear before the garbage truck got there (they usually did). I pestered friends and acquaintances. I tried selling a few more things online.
I have talked to people who have found the task of purging so daunting they threw up their hands and said, "Oh, just move it all and I'll go through it in the new place."
I was tempted to do it myself. Then I kept thinking of the space we wouldn't have. And I'd go back to my task.
Despite my best efforts, there was still an excess of Stuff come moving day. We are storing a few boxes at a friend's house until we can figure out what to do with them.
And as for the new place, well, let's just say it's already full. Really full.
So now we are doing a second round of downsizing that includes editing our remaining belongings so the new, smaller space does not seem quite so cramped.
Friends who have downsized have talked about feeling liberated at the end of the process. I just felt tired. Getting rid of Stuff is a lot tougher than acquiring it.
"We downsized a year ago and we're still at it!" a new neighbour commented.
I can believe it.
-- Postmedia News
Downsizing tips from a pro
Jill Pollack, host of the HGTV show Consumed, says downsizing can be an emotional experience. Here are her tips for successful downsizing.
Time: Create a realistic timeline. Don't be too ambitious or too lazy. If you dedicate two or three full weekends to the project, that should take care of most of it.
Helpers: Get all hands on deck. Have friends and family help out. It can be a fun process if you act as a team.
Be realistic: Realize you can live with less. There is so much we don't really need.
Prepare: Be realistic about your new space. Try to measure the areas so you know what furniture will fit.
Be steady: Purge as you go. Get rid of stuff that is broken (and you don't want to fix), stained, mouldy or out of style.
Shred, shred, shred: Deal with all of the old paperwork and make a clean start. Most of it will be out of date (except tax and property papers) and so much now is online so we don't need to keep as much paper as we used to. Invest in new filing products.
Sell off: Consider a tag or estate sale. It's a good way to make some extra cash, especially if you're reluctant to get rid of something because you "paid good money for it." Otherwise, donate.
Resist: Rent a storage unit only as a last resort. People don't really ever go back into their unit and it's a waste of money. Things just rot in there for years.
Holding on: Be honest about the sentimental stuff. Keep one plastic sealed bin of memorabilia per person -- otherwise, pass it on.
Ask yourself: Which of the items I own now are really important to me? Is it beautiful, useful, or loved? Or am I just keeping it out of habit?
Renovation & Design
Tips to keep you warm this winter
IT'S the time of year when heating experts start offering their handy hints for homeowners.
These heating tips come from the Carrier Corp., one of the world's largest manufacturers of heating, ventilation and air conditioning equipment.
We've added our own comments and additions to the experts' tips.
1. Remove clutter: Boxes, storage units and clutter near the furnace can obstruct air flow, preventing your system from working as efficiently as possible.
This isn't just a money-saving issue, it's also a safety point. It's so easy to park a cardboard box in the furnace room in summer when it doesn't matter, and forget to move it later when the combination of heat and flammable material constitutes a fire hazard. Be very cagey about what you put near a heat source.
2. Maintain your equipment: An annual service inspection of your home's heating system by a certified technician will ensure equipment is in good condition and operating at peak performance.
It's an even better idea to plan for the service visit at the same time each year, so you make a note on your calendar to call and include the fee in your annual expense budget.
3. Change that air filter: A dirty filter in your heating system slows the flow of air and makes your system work harder.
Change your filter monthly or as instructed by the manufacturer.
Some filters can be cleaned and reused, while others are disposable. Ask your service technician what is recommended for your furnace.
4. Look for leaks: Check for air leaks in your home's duct system and around doors and windows. Even the most efficient new system will not be able to halt energy losses due to leaks.
Make sure ducts are sealed and select insulation with a high "R" value.
But don't seal up all leaks until your certified technician has given your furnace a clean bill of health and you're certain there's no danger of carbon monoxide collecting in the well-sealed house. Better yet, invest in a carbon monoxide alarm if your furnace could, in any circumstance, produce this poisonous gas.
5. Add a humidifier: Moist air feels warmer than dry air. A humidifier could allow you to keep your thermostat at a lower setting without compromising comfort.
6. Install a programmable thermostat: A programmable thermostat automatically adjusts your home's temperature to provide the most comfort when your home is occupied. That means you can set the thermostat to dial down the temperature during the hours when no one is home.
Other experts say many programmable thermostats are so complicated, people can't be bothered to use them. But see the story above on Nest Thermostats, which program themselves after they "learn" what the homeowners do for a few days.
-- Postmedia News
Renovation & Design
Prep home for BIG CHILL
With months of cold weather looming, the outlook could be doom and gloom unless proactive measures are taken to protect a home from the elements.
Unprepared properties are susceptible to a worst-case list of scenarios that could potentially damage and reduce the home's value. The end result could be devastating, so don't ignore the following:
Chim chim cher-ee
If you don't clean the chimney every year, a house and equity could go up in flames. Why? One word: creosote. Burning wood, and especially unseasoned logs, can cause creosote to build up inside the chimney. Creosote is combustible and can lead to a chimney fire, which can quickly consume the rest of a house. Cleaning a chimney is not a do-it-yourself job, so consult a professional to ensure the chimney is clean as a whistle.
Draft dodger
In general, older houses are inadequately insulated. Without proper insulation, heat goes out and energy bills go up.
But wait, there's more. Another bonus feature in older homes is the tendency to settle, and often it does so unevenly. Note that draft from around the door or the window? Time and gravity often take their toll, leaving behind openings that allow air to easily enter and exit the home. Weatherstripping around windows and doors will help seal these openings and add another element of cost and cold protection.
Don't get burned
Ignoring your furnace is a bad idea. It sits unused and unattended during the spring and summer and sometimes much of the fall. When the cold rolls around, expecting it to kick into action on command is like asking a couch potato to run a marathon. Moisture and humidity can rust parts, lubrication can dry up and dust and dirt can collect like cholesterol in an artery.
Neglected furnaces are typically less efficient and cost more to operate. They can also leak harmful gases such as carbon monoxide back into the home without the owner ever being aware of the situation. Most furnace problems can be prevented, so do not ignore this critical system.
Var mint invasion
It's cold outside, and you want to be indoors. So do all of our other warm-blooded friends. Rats and mice like the basement and the spaces between your walls. Squirrels, bats and raccoons will nest in the attic. To keep these pests out of the house, seal up all exterior openings. Eliminating easy-access entry points will force these animals to look for shelter elsewhere.
Tearing the roof off
Leaks can wreak untold havoc, but there's more to consider: piled-up leaves can hold water that will eventually find its way in through tiny cracks and snow can add additional weight that may sometimes be more than a roof can handle. Other than shingles, nothing is supposed to be on the roof, so make sure to remove anything that piles up.
Burst, bust or busted? Each will leave you all wet
Cold temperatures cause water to freeze and metal to contract. Combine the two, and under the worst conditions, you've got a potential busted pipe. Insulate pipes and outdoor faucets to make them less susceptible to the elements and reduce the chances of a pipe spewing water into the house.
I've fallen and I can't get up
Pay attention to all parts of your property where ice and snow can build up. Sidewalks and stairways can be extremely dangerous when covered with the white or slippery stuff. Falls on these slick surfaces are not uncommon and can leave loved ones with serious injuries. Make sure to keep salt and sand at the ready to ensure all driveways and walkways are easily navigable.
-- Postmedia News
Renovation & Design
Plenty to consider when upgrading your furnace
Today, I would like to help you make an informed decision about upgrading your furnace.
On Dec. 31, 2009, a new national minimum-energy performance standard for residential gas furnaces was introduced. This applies to virtually all gas furnaces sold in Canada and requires a minimum fuel efficiency level of 90 per cent. This is achieved by using "condensing technology," where products of combustion are vented through a plastic pipe, commonly routed through a side wall.
There may be a small existing stock of mid-efficient (80 per cent with respect to fuel efficiency) available; I recommend a high-efficiency furnace when possible. Energy-efficient furnaces are also cost-effective.
The installation of a high-efficiency gas furnace typically needs changes to the venting system. Sometimes, hot water heater venting alterations may be necessary.
There may be some situations where through-wall venting can be more complex. Examples include narrow, attached houses with front and rear obstructions, closely spaced doorways and large windows.
If your house is narrow and attached to neighbouring dwellings (on both sides), and your gas furnace is more than 15 years old, consider consulting a licensed heating, ventilating and air conditioning (HVAC) professional to assess your situation and recommend solutions.
When considering adding or replacing air conditioning or heating to your home, insist the installing contractor "sizes" the system properly. Qualified contractors will not recommend equipment size based solely on the size of your home or assume that your existing equipment was sized properly in the first place. Tell your contractor if you plan to renovate in the near future.
To complete the design load calculation, the contractor will need to take measurements during the initial visit and ask questions. They take into account:
-- Local climate conditions
-- Size and number of windows that let in heat from the sun
-- Existing insulation levels of the home
-- Number and lifestyle of your home's occupants
-- Predicted or known air exchange rate of home
There is only one correct size of equipment for your home. Oversized equipment can result in increased fuel consumption and higher operating costs. Extra use can contribute to premature part failure, higher noise levels and reduced comfort. Under-sized equipment will also cause comfort problems. Ideally, the equipment should be designed within plus or minus 10 per cent of the required size.
For more home improvement information, send Shell an email or to find a certified HVAC contractor in your area go to www.AskShell.com.
-- Postmedia News
Renovation & Design
Don't spring a leak when designing bath
Dear Leanne:
We have seen images in bathroom renovation magazines where the tiles used in the walk-in shower were also used to create a bath. The idea is very intriguing, but we have never seen this done in real life. We assume it is built with two-by-fours and 1/2-inch plywood as a frame, but we are not sure of how the base should be made to ensure there is no leaking. Do you have any thoughts on this idea?
ANSWER: I too have seen this design concept in magazines and it does look very interesting. I will pass on the wisdom I gained from talking to a few people in the construction and renovation businesses.
First off, yes it can be done, but do spend time investigating all the products that are available/required.
It has been suggested that you select a waterproof liner as a base. This may be made of rubber or acrylic. The base would be applied in a similar fashion as a shower curb, but would continue up the wall to ensure a waterproof membrane, should the tile and grout leak with time.
It is recommended to use larger tiles rather than smaller, as the tile surface is more stable than grout, which will deteriorate over time. Ensure you use a mould-and mildew-resistant epoxy grout between the tiles for an effective seal.
Another recommendation is to ensure your bathroom floor is sound and can handle the weight of tile, grout and water. Pre-formed tubs are relatively light in comparison to tile and grout. One thing you need to consider is the comfort and maintenance of a tile tub.
Pre-formed tubs have slightly reclined backs and have a continuously smooth surface, which is comfortable and easy to clean. Tiled tubs are built on a rectangular platform with 90-degree wall angles. The grout and tile are the surface that you will be sitting on and cleaning regularly.
A compromise is to use a preformed tub as the base and build a tile surround for it. If you have a large bathroom, this tub can become the focal point and sit in the middle of the room with ample walking space all around.
In any event, you may wish to contact the Tile Institute of America for specific advice (www.tileinstituteofamerica.com).
-- Postmedia News
Leanne Brownoff is an Edmonton interior design consultant who welcomes your questions at
leannebrownoff@shaw.ca
Renovation & Design
Foundation leakage a common problem
QUESTION: We have water leakage underneath the wallboard on one wall of our basement when there is severe rainfall. At this point we haven't removed the wallboard in that section to actually view the wall. However, one of the options suggested to us to deal with this type of problem is epoxy injection. What are your thoughts on this process?
Thank you for your help. David Singer
ANSWER: There may be a couple of different approaches to fixing the seepage issue in your foundation but first you must expose the section where you are seeing the damage. This will allow you to have the problem properly evaluated and then decide on how to proceed.
Foundation leakage is one of the most common problems facing homeowners, no matter where you live. It often occurs only during heavy rains, as with your home, or during the spring thaw, but it can also be a nagging, chronic problem. The issue can be due to simple deterioration of the damp-proofing on the outside of the foundation and/or blockage of weeping tiles, but can also be due to cracks in the concrete.
If you have a very old home with a stone foundation, the leaking can be due to typical deterioration in the mortar that binds the stones together. If that is the case, epoxy injection is not an option, so I will assume that you have a concrete foundation for the purpose of our discussions.
Whatever the actual cause of the water intrusion, it will be very tough to determine without seeing the foundation wall. From the outside, the foundation wall may be partially visible, but only for a short distance above grade. The only way to get a good idea of the condition of the foundation wall is to remove the wall coverings and insulation. If you've had several seepage incidents, the wall covering may be damaged and need replacement anyway. Removal of moisture-damaged sections -- especially if it's drywall -- is important to prevent mould growth.
So, the first step is to remove a full sheet of drywall in the vicinity of the leakage and see what the wall looks like behind. Once you remove the wall covering and insulation the initial item to inspect is the condition of the wood framing supporting the wall sheathing.
If the bottom plate is black and soft when probed, it's rotten and will have to be replaced. That is an indication that the moisture intrusion has occurred several times. If the vertical studs are damaged in a similar manner, that's evidence that your problem has been going on for a long period of time.
In either case, the damaged wood should be cut out and discarded. This also will allow better access to the foundation walls. If the wood is only slightly stained and does not allow a screwdriver to easily penetrate the surface it should be sound enough to leave in place.
Once the interior of the foundation is exposed in the area where the water was seen on the basement floor, examine the condition of the interior surface to help you determine the defect that is causing the leakage.
First, you should look for any obvious cracks or holes in the concrete. If you see vertical or slightly diagonal cracks larger than three or four millimetres wide, this is the likely spot that the water is coming through. Also, look for rusty stains running straight down from old form ties holes.
If no cracks or leaking snap ties are visible, or if there are only small hairline fissures, look further at the interior surface of the wall. If the surface is spalling, crumbling, or if paint can be seen flaking off in large chunks this may give you a further clue in identifying the problem.
Finally, if the concrete is in generally good condition but there are large amounts of white salts, or efflorescence, on the surface, that will also help to decide on the type of repair needed.
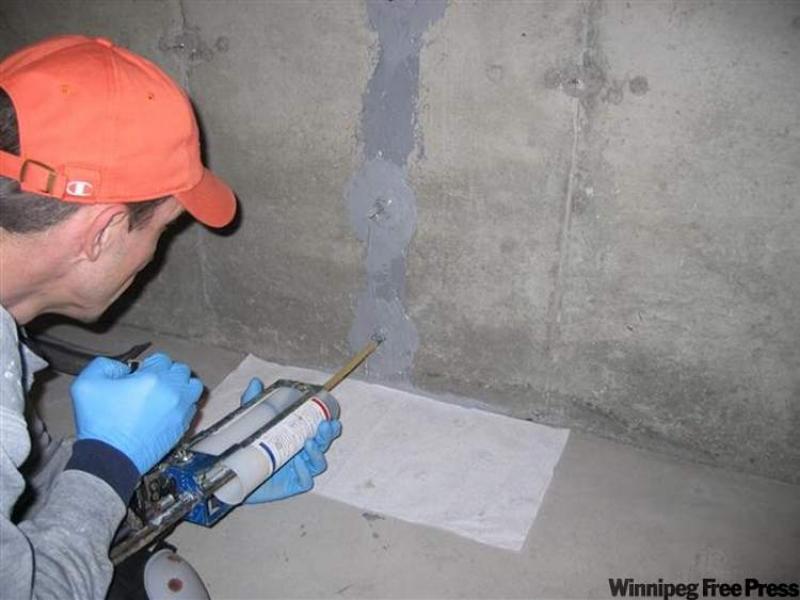
Epoxy injection is a good method of stopping isolated foundation leakage if the water is coming in through small to moderate-sized cracks or through rusted snap ties. To inject the epoxy, the entire crack will have to be exposed and small holes drilled in various areas of the crack or the rusty snap ties.
Epoxy is a very hard and durable compound that has proven effective in sealing small foundation cracks and actually strengthens the area to prevent enlarging of the opening due to further water damage. While the epoxy method is costly, and fixing more than a single small crack can be quite expensive, it's normally less costly and a lot less work than digging up the soil outside the foundation to expose and repair a crack in that manner.
You will have to replace the interior wall covering after the crack remediation, but it was probably water-damaged anyway.
If you find more extensive deterioration or no visible cracks or holes when you expose the interior of the foundation, then you will have to look at alternative methods for stopping the water. Whether it's deteriorated damp-proofing, plugged weeping tiles or surface deterioration to the outside of the foundation, it will have to be repaired from the exterior. This will involve digging a trench outside the entire area effected, cleaning the foundation walls, replacing the damp-proofing or installing a membrane, replacing weeping tiles and then backfilling and landscaping.
While this sounds somewhat unachievable, it's commonly done and may be about the same cost asfilling several cracks with epoxy. Exterior repairs will also have the added benefit of replacing the weeping tile, which is an important water-management system.
If you're fortunate, when you remove the wall coverings you will find a lone, obvious crack responsible for the leakage which will allow you to call a foundation contractor to inject it with epoxy and fix the problem at a moderate cost.
Ari Marantz is the owner of Trained Eye Home Inspection Ltd. and the President of the Canadian Association of Home & Property Inspectors - Manitoba (www.cahpi.mb.ca). Questions can be e-mailed to the address below. Ari can be reached at (204) 291-5358 or check out his website at www.trainedeye.ca.
trainedeye@iname.com