Renovation & Design
Renovation & Design
Time to cut and run... indoors
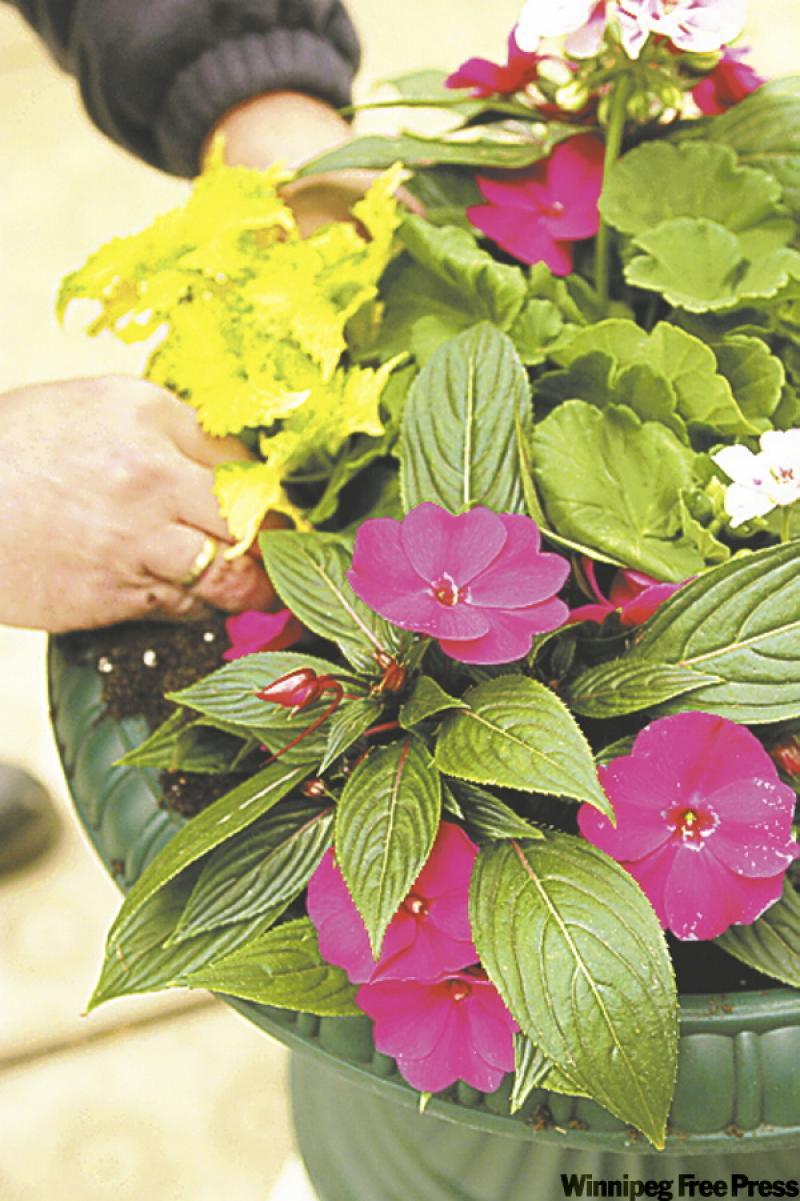
It's time to get moving on your winter plan for plants.
If you want to have any cuttings of outdoor plants, you should be taking them now. And if you are going to take certain major decorative plants indoors for the winter, you should make a decision on your strategy.
I have a few geraniums (pelargoniums) and fibrous-rooted begonias that I want to have around next season, so my usual habit is to take one or two plants in over the winter, kept under lights. Sometimes I take tip cuttings as well, so that I can plant up several individual pots of the specific plants I want to keep.
The cuttings I make are from 7.5 to 10 centimetres long and contain a growing tip that's producing buds and leaves. I trim off the lower leaves and any flower buds that are opening, just leaving the last three small leaves on the cutting.
All the cuttings go into the divisions of small cell packs filled with perlite. This is a much more open and airy product and encourages more rapid root growth. You can leave the cuttings outdoors until the weather turns cool. Just make sure the perlite never dries out completely.
In about three weeks, once the cuttings have started developing a good set of roots, you can take the cuttings out of each cell pack and put them into individual small pots filled with garden soil and compost. These are the containers they can be grown in until next spring, or you can plant several cuttings in the same larger pot to make a "mother plant."
The other event we should plan for is to start organizing the repatriation of any decorative semi-houseplants that we want to keep over the winter. I'm thinking specifically about non-hardy decorative plants such as hibiscus and oleander.
It's time to get moving on your winter plan for plants.
If you want to have any cuttings of outdoor plants, you should be taking them now. And if you are going to take certain major decorative plants indoors for the winter, you should make a decision on your strategy.
I have a few geraniums (pelargoniums) and fibrous-rooted begonias that I want to have around next season, so my usual habit is to take one or two plants in over the winter, kept under lights. Sometimes I take tip cuttings as well, so that I can plant up several individual pots of the specific plants I want to keep.
The cuttings I make are from 7.5 to 10 centimetres long and contain a growing tip that's producing buds and leaves. I trim off the lower leaves and any flower buds that are opening, just leaving the last three small leaves on the cutting.
All the cuttings go into the divisions of small cell packs filled with perlite. This is a much more open and airy product and encourages more rapid root growth. You can leave the cuttings outdoors until the weather turns cool. Just make sure the perlite never dries out completely.
In about three weeks, once the cuttings have started developing a good set of roots, you can take the cuttings out of each cell pack and put them into individual small pots filled with garden soil and compost. These are the containers they can be grown in until next spring, or you can plant several cuttings in the same larger pot to make a "mother plant."
The other event we should plan for is to start organizing the repatriation of any decorative semi-houseplants that we want to keep over the winter. I'm thinking specifically about non-hardy decorative plants such as hibiscus and oleander.
The first step is to give each plant a good washing. You don't want to bring any unwanted guests into the home. You can use mild dishwashing soap or insecticidal soap for a really thorough job. Remember to wipe under the leaves, because this is a favourite place for insects to lay eggs. Rinse the leaves with clear water.
Next, grab the pots, throw them indoors and then forget about them. The big difference will be a sudden drop in light levels that they're exposed to. If this drop is too fast, you'll have a huge loss of leaves. You can limit the loss by making the move gradually. I would suggest bringing the plants indoors on the nights when the temperatures are going to go below 10C, and then taking them back out the next morning.
Gradually, over the course of a week, let the plants harden off a bit. Growing tips will slow down their activity. Minimize the immediate leaf loss by putting the houseplants back in their old indoor winter locations -- putting the sun-lovers (rosemary, pelargonium, etc.) in the brightest place you have.
When leaves start changing colour and falling off, it's a good time to cut back the growing tips of all your plants, just to slow them down a bit and keep them as compact as possible.
And don't feed the plants any fertilizer while they slow down. The time to restart feeding will be if you notice any new growth. This might happen with the plants getting the best light.
Be prepared to face the loss of those older leaves for a few weeks after bringing the plants in.
---- Canwest News Service
Renovation & Design
ASK THE INSPECTOR: Can heating system handle new radiators?
QUESTION: Our 80-year-old home has hot-water heat on the first and second floors, but the entire basement is only heated by one small electric baseboard. May we tap into the existing hot-water pipes in order to connect two radiators purchased from a scrap dealer? Would this compromise the heating system's ability to properly heat our upper floors?
Thank you.
Leanne Chernecki, email
ANSWER: I commend you for seeking advice before attempting a modification to your heating system that may cause problems if not done correctly. There are several factors that will affect the answer and thus the success of your addition of heat to the basement. Some of these have to do with the difficulty in modification of a very old system and others are more straightforward.
Without getting into specific details, which may be beyond the technical sophistication of this column, you should be able to add more radiators to heat your basement if your current boiler has enough heating capacity.
Every heating system installed in homes has a specific maximum heating capacity, which should be sized properly to heat most effectively. If the unit installed in your home is grossly oversized, it will waste energy and may cycle too infrequently to heat properly. If the unit is too small, it may just be able to currently heat the upper floors of your home, without the additional load of the basement. This can be evaluated by calling a licensed heating contractor familiar with hydronic systems to calculate the proper size of boiler required for your home and see if yours can handle the added living space.
The next concern is with the addition of the radiators that you have bought. There are two main types of hydronic heating systems that use boilers. The most common for homes incorporates hot water and the second, less common, uses steam. There may be differences in the types of older, cast-iron radiators for the two systems. You should ensure that you have bought the correct type of radiator and that it has the proper fittings to use with your hot-water system. Even if they are the wrong type, there may be ways to modify them, but that only adds more expense to the job.
Another consideration is the condition of the used rads. While these may have an almost unlimited life expectancy, all units don't last forever. They may be damaged and have small cracks or leaks that are not visible to the naked eye. These components should be pressure-tested before installation to ensure they will not leak when filled with hot water.
It would be a major waste of time and money if you have to shut down and drain the entire system just to remove the newly installed rads because of a small leak.
Another thing to consider when upgrading with additional radiators to heat your basement is the overall condition of your heating system. Because modifications to hot-water-heated homes will require draining the entire system, this may be an ideal time to evaluate the condition of the current components and replace those that are deteriorated, leaking, or very old.
These may include older iron piping, pressure tanks, pumps, gauges and other safety controls. Once the system is drained and a pipefitter is in the home with proper equipment to cut and fit the iron pipes, further modifications may be relatively easy.
If the circulation pump is noisy and whining, the additional load of the new radiators may accelerate the damage to the worn bearings. This is an ideal opportunity to upgrade these components and prevent the major expense of an emergency-service call in the future.
If your current boiler is beyond its normal life expectancy or doesn't appear to have the capacity to handle the additional living space, boiler replacement is another option. But this is quite costly and should be carefully considered before embarking on any system upgrades. New boilers cost several thousands of dollars, and it may take several decades to recoup that cost from the savings in gas due to increased efficiency.
However, if you do have an original, extremely large cast-iron boiler, upgrading in the near future is almost a certainty. In that case, budgeting for the major expense will be important before opening up a potential can of worms by adding two rads.
With any heating system, but especially a hot-water or steam hydronic system, modifications should not be undertaken by the average homeowner. Unless you are an experienced plumber or pipefitter with lots of mechanical experience, this will not be something you can handle. There is much more to a proper modification of this system than cutting a few pipes, soldering some new ones and adding the new radiators. A proper evaluation of the current heating system by a licensed heating contractor should be done before any further plans are made.
You should go into this with your eyes wide open to the possibility that major costs may be associated with this seemingly small addition. If that does turn out to be the case, installation of additional electric baseboard heaters by a licensed electrician may be a more cost-effective solution to a cool basement, at least in the short term.
Ari Marantz is the owner of Trained Eye Home Inspection Ltd. and the president of the Canadian Association of Home & Property Inspectors -- Manitoba (www.cahpi.mb.ca). Questions can be emailed or sent to: Ask The Inspector, P.O. Box 69021, #110-2025 Corydon Ave., Winnipeg, MB. R3P 2G9. Ari can be reached at (204) 291-5358 or check out his website at www.trainedeye.ca
trainedeye@iname.com
Renovation & Design
SOLUTIONS: Leather cleaning method depends on stain
QUESTION: You helped me with a problem several years ago when my car trunk was drenched in gasoline. You told me to stuff the trunk with crumpled up newspaper, which I did, and the smell was gone. You also helped my daughter fix scratched CDs using peanut butter; she is a library technology student at Red River College and now the class keeps a jar of peanut butter in the classroom at all times for scratched CD emergencies.
My daughter and I really enjoyed your presentation at the Winnipeg Autumn Home Show (love the humour)! Here is my question; what is the best way to clean stains on leather and suede fabric? I couldn't find treatments in any of your three books. I have a leather jacket and know it's expensive to clean, so any tips would be appreciated.
-- Barbara (Lowe Farm)
ANSWER: In terms of leather, it is difficult to explain how to remove stains on leather without knowing what caused the stain. One solution to try (if you don't know what caused the stain) is to apply boiled linseed oil with a clean cloth. For regular leather cleaning; mix one quarter cup vinegar and half cup water; use a cloth to wipe off wax build-up. To restore the shine use a circular motion and apply saddle soap or Urad to leather. Never use furniture polish or varnish on leather because they may contain solvents that cause leather to become sticky. As for suede fabric, my favourite solution is to make a paste of baking soda and water. Leave it on the area for 10 minutes and then swipe the spot back and forth with a stiff brush until the area is clean.
QUESTION: In my last apartment my sofa bed was against an outer wall and I did notice that as the weather warmed there was a musty odour. I chalked this up to the fact that the upholsterer had made the skirt too long and air was not circulating underneath. I changed the fabric-covered mattress for a plastic covered one and sprayed the entire sofa with Febreeze and eventually Nil Odor.
The item has been on an inner wall for almost five years and I notice the same odour when the outside temperature rises. The bed has only been pulled out for use on less than 20 occasions during the many years I have had it, I air it out every summer when the specific aroma reminds me to do so. I hope you can give me a quick response before my wool carpet is also affected.
-- Thank you, Max, Winnipeg
ANSWER: Airing the sofa out is a good idea because it sounds as though mould grew or is growing somewhere inside of the sofa bed, perhaps in the mattress. In my opinion commercial air freshener sprays mask odours for awhile but don't actually clean. If I were you I would begin by having the bed professionally steam cleaned.
You may want to consider storing thin piles of newspaper inside of the sofa when the bed is closed, doing this will help absorb odour and moisture.
Reena Nerbas is the author of the national bestselling Household Solutions series. Her website is www.householdsolutions.org. You can contact her at Box 429, Blumenort, MB, ROA 0C0.